November 24, 2012

The MorphX Tools - Project Designer

How to Create a Project in AXapta

For a fully customizable overview of the elements, you can use projects. In a project, elements can be grouped and structured according to the developer’s preference. The Project Designer is a powerful alternative to the AOT because you can collect all the elements needed for a feature in one project.
Creating a New Project
You open the Project Designer by clicking the Project button on the toolbar. Figure 1 shows the Project Designer and its Private and Shared projects.

Figure 1. Project Designer, showing available private and shared projects


Except for its structure, the Project Designer behaves exactly like the AOT. Every element in a project is also present in the AOT.
When you create a new project, you must decide whether it should be private or shared among all developers. You can’t set access requirements on shared projects. You can make a shared project private (and a private project shared) by dragging it from the shared category into the private category.

Note
Central features of Dynamics AX 2009 are captured in shared projects to provide an overview of all the elements in a feature. No private projects are included with the application.
You can specify a startup project in the Options dialog box. If specified, the chosen project automatically opens when Dynamics AX is started.

Automatically Generated Projects
Projects can be automatically generated in several ways—from using group masks to customizing special project types—to make working with them easier. We discuss the various ways to automatically generate projects in the sections that follow.

Group Masks
Groups are folders in a project. When you create a group, you can have its contents be automatically generated by setting the ProjectGroupType property (All is an option) and a regular expression as theGroupMask property. The contents of the group are created automatically and kept up to date as elements are created, deleted, and renamed. Using group masks ensures that your project is always current, even when elements are created directly in the AOT.
Figure 2 shows the ProjectGroupType property set to Tables and the GroupMask property set to <xRef on a project group. All table names starting with xRef (the prefix for the Cross-reference tool) will be included in the project group.

Figure 2. Property sheet specifying settings for ProjectGroupType and GroupMask

Figure 3 shows the resulting project when the settings from Figure 2 are used.

Figure 3. Project created by using group masks


Filters
You can also generate a project based on a filter. Because all elements in the AOT persist in a database format, you can use a query to filter elements and have the results presented in a project. You create a project filter by clicking the Filter button on the project’s toolbar. Depending on the complexity of the query, a project can be generated instantly or might take several minutes.
Filters allow you to create projects containing the following kinds of elements:
  • Elements created or modified within the last month
  • Elements created or modified by a named user
  • Elements from a particular layer

Development Tools
Several development tools, such as the Wizard wizard, produce projects containing elements the wizard creates. The result of running the Wizard wizard is a new project that includes a form, a class, and a menu item—all the elements comprising the newly created wizard.
You can also use several other wizards, such as the Report Wizard and the Class Wizard, to create projects. You can access these wizards from the Microsoft Dynamics AX drop-down menu by clicking Tools\Development Tools\Wizards.

Layer Comparison
You can compare all the elements in one layer with the elements in another layer, called the reference layer. If an element exists in both layers, and the definitions of the element are different or the element doesn’t exist in the reference layer, the element will be added to the resulting project. You can compare layers by clicking Tools\Development Tools\Code Upgrade from the Microsoft Dynamics AX drop-down menu.

Upgrade Projects
When you upgrade from one version of Dynamics AX to another or install a new service pack, you need to deal with any new elements that are introduced and existing elements that have been modified. These changes might conflict with customizations you’ve implemented in a higher layer.
The Create Upgrade Project feature makes a three-way comparison to establish whether an element has any upgrade conflicts. It compares the original version with both the customized version and the updated version. If a conflict is detected, the element is added to the project.
The resulting project provides a list of elements to update based on upgrade conflicts between versions. You can use the Compare tool, to see the conflicts in each element. Together, these features provide a cost-effective toolbox to use when upgrading.
You can create upgrade projects by clicking Tools\Development Tools\Code Upgrade\Detect Code Upgrade conflicts from the Microsoft Dynamics AX drop-down menu.

Project Types
When you create a new project, you can specify a project type.  Two specialized project types are also provided in Dynamics AX:
  • Test project Project used to group a set of classes for unit testing
  • Help Book project Project used for the table of contents in the online Help system
You can create a custom specialized project by creating a new class that extends the ProjectNode class. Specialized projects allow you to control the structure, icons, and actions available to the project.

-Harry

How to go to the object from Infolog

How to go to the object from Infolog

When we print a transaction id through infolog Usually, it is more useful if the user can go directly to the object from an Infolog line.

For example, we need to see all the BOM without any active version. By the way, this is a good example, too, for what we cannot do by means of Advanced Filter but quickly by coding a short job.


static void SIBOMwithNoActiveVersion(Args _args)
{
    BOMTable    bomTable;
    BOMVersion  bomVersion;
    int         nmbr, i;
    boolean     printOnly = false;
    ;

    SetPrefix('BOMs without any active version');
    Nmbr = 0;

    while select bomTable
    notexists join bomVersion
    where bomVersion.Active == NoYes::Yes
    && bomVersion.BOMId == bomTable.BOMId
    {
        nmbr++;
        info(strfmt("%1 %2, %3, %4, %5, %6, %7",
                                          nmbr,
                                          bomTable.BOMId,
                                          bomTable.Name,
                                          bomVersion.ItemId,
                                          bomVersion.Name,
                                          bomVersion.Active
                                          ),"",
        SysInfoAction_TableField::newBufferField(bomTable, fieldnum(bomTable, BOMId)));

    }

}

Now the user can opt for Show from the context menu or just double-click on the interesting line to open the related form.


-Harry

November 16, 2012

Opening the table from x++ code

Opening the table from x++ code

This code helps you to open the any Table from X++ code. Here is an example for SalesTable, just copy and paste this into a job you will get the table.

static void TableBrowser(Args _args)
{
SysTableBrowser sysTableBrowser = new SysTableBrowser();
;
//Browse the SalesTable table
sysTableBrowser.run(tablenum(SalesTable ));
}

How to run Client Batches on AX 2009

How to run Client Batches on AX 2009

In AX 2009 the batch engine has been changed to run as a service.
The batch services do only process server batches they don't process client batches aynmore.

There might still be some situations where you would like to run client batches.
The following description explains how to do this.

  • Create a new batch group 'Client' which is used for client batches later.
    (Administration -> Setup -> Batch groups)
  • Add this batch group to an AOS acting as batch server.
    (Administration -> Setup -> Server configuration)
    This is needed to change the status from 'Waiting' to 'Ready' on the batch tasks and to 'Execute' on the batch jobs.
    The batch server will not process any client batches.
  • Start the legacy batch client
    (Basic -> Periodic -> Batch -> Processing)
  • Select the new created batch group 'Client' and press 'OK'
The client batch server will now process all client batches of the 'Client' batch group.
-Harry

November 10, 2012

Designate a batch server


Designate a batch server

A batch server is an Application Object Server (AOS) instance that processes batch jobs. Batch jobs are used to run tasks, such as printing reports or posting journals, at a specified time and probably on a different computer.
The first AOS to be set up is automatically designated as a batch server. Use multiple batch servers to increase throughput and reduce the amount of time it takes to run batches.

When you set up a batch server, you can specify the times that it is available for batch processing. We recommend excluding a server from batch processing when it is busy with regular transaction processing. For example, you may have servers in different time zones. You can set server schedules so that each AOS is available for user traffic during the day and for batch traffic overnight.

For more information about batches, 
see the Applications and Business Processes Help, 
available from the Microsoft Dynamics AX Help menu. 

1. Click Administration > Setup > Server configuration.

2. Press CTRL+N to add a new batch server.

3. On the Overview tab, enter a server ID in the following format: InstanceName@ServerName.

4. Select Is Batch Server to enable batch processing on the server. 

5. On the Batch server schedule tab, enter the maximum number of batch tasks that can be run on the AOS instance at one time. The server will continue to pick up tasks from the queue until it reaches its maximum.

6. To specify when the server is available for batch processing, enter a starting time in the Start time field and an ending time in the End time field. Press CTRL+N to enter an additional time period.
Note: If the server is running a task when its batch processing availability ends, the task will continue running to completion. However, the server will not pick up any more tasks from the queue.

7. On the Batch server groups tab, use the arrow buttons to specify the batch groups that can run on the selected server. Batch groups are used to direct batch tasks to specific servers.

- Harry

How to update vendor addresses in Dynamics AX

How to update vendor addresses in Dynamics AX 2009

Here is trick of X++ by which we can update the address for a vendor in Dynamics ax 2009,  below job is the possible answer and may helps.


static void UpdateVendAddressType(Args _args)
{
VendTable          vendTab; // Replace VendTable with CustTable when run this for customers.
DirPartyTable     dirPartyTab;
Address              addTab;
;
ttsbegin;
while select vendTab join dirPartyTab join forupdate addTab
                                                          where vendTab.PartyId        == dirPartyTab.PartyId
                                                             && addTab.AddrTableId == dirPartyTab.TableId
                                                            && addTab.AddrRecId     == dirPartyTab.RecId
{
      if(addTab.Name == ‘Birincil Adres’)
     {
        addTab.type = AddressType::Payment;
         addTab.update();
     }
}
ttscommit;
}

- Harry

November 08, 2012

Create Alert using X++ codes

Create Alert using X++ codes


Sometimes Infolog message is not sufficient enough for prompting information to users. It is possible to create alert message using code as an alternative. It is fairly simple to create alert message manually by just inserting a new record in EventTable where all the alert messages are stored. Below is a code snippet for creating alert using code in AX 2009.
Try following code......


static void CreateAlertUsingCode(Args _args)
{
EventInbox          inbox;
;
inbox.initValue();
inbox.ShowPopup     = NoYes::Yes;
inbox.Subject       = "This is the Alert subject";
inbox.Message       = "This is the Alert message";
inbox.AlertedFor    = "This alert is just information no links are available";
inbox.SendEmail     = false;
inbox.UserId        = curuserid();
inbox.TypeId        = classnum(EventType);
inbox.AlertTableId  = tablenum(Address);
inbox.AlertFieldId  = fieldnum(Address, Name);
inbox.TypeTrigger   = EventTypeTrigger::FieldChanged;
inbox.CompanyId     = curext();
inbox.InboxId       = EventInbox::nextEventId();;
inbox.AlertCreatedDateTime = DateTimeUtil::getSystemDateTime();
inbox.insert();
}
 
- Harry

November 07, 2012

SysQueryRangeUtil class -Use method name as query criteria(Reports)

SysQueryRangeUtil class - use method name as query criteria

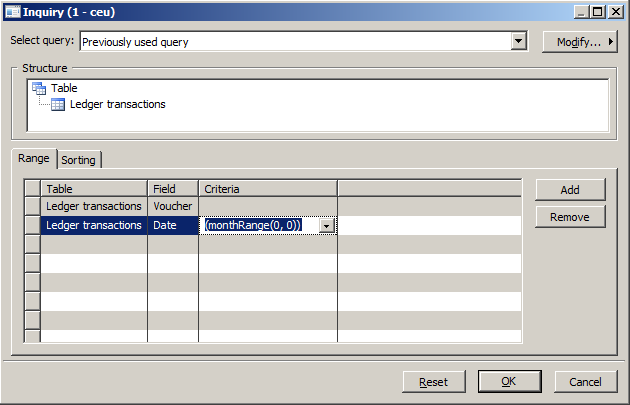
This is a cool new feature in AX 2009 - you can now use a method name instead of literal value in query criteria!

For example, if you run a report every month, previously you need to change the date criteria in each month you running the report 
(ie.“01/06/2010..30/06/2010”,  “01/07/2010..31/07/2010”, etc).
Now you only need to enter (monthRange(0, 0)) which will automatic return the correct first day and last day of the month.

For Example: - 


You can also refer to the SysQueryRangeUtil class – there are a lot of useful methods such as dateRange(), currentEmployeeId(), etc. It’s also possible to create new method on this class for special purpose. But do this with caution.


- Harry

Finding all data sources in a form through Job

Finding all data sources in a form through code

Hi ,
Here is small trick to find the datasource in form. Open job node , and a new job and copy paste following code over there,.....

static void AllDataSourcesInForm(Args _args)
{
    Args args = new Args();
    FormRun fr;
    FormBuildDataSource formBuildDataSource;
    counter i;
    ;
    args.name("CustTable");   // its your FORM name
    fr = ClassFactory.formRunClass(args);
    for(i=1 ; i<=fr.form().dataSourceCount();i++)
    {
        formBuildDataSource = fr.form().dataSource(i);
        info(new DictTable(formBuildDataSource.table()).name());
    }
}


When you run this job you get all data source which is used in CustTable Form


- Harry

November 06, 2012

Differences among reread(), refresh(),research()

Differences among reread(), refresh(),research()

When working with Forms, commonly after opened the form we need to do some operations with existing data. In few cases we need to interact with data base again and again in order to do. For that we will use these methods. But some times its create confuse what exactly use of these methods, when should we call these methods and why, here is brief info these methods...

refresh() : this method will refresh the data in the data source cache. But it will not interact with the data base to fetch the new/updated record values. What ever values have fetched in the previous query will store in data source cache, this method will just refresh the data source cache only.

reread(): this method will interact with the data base and runs the query against the data base in order to fetch the new/updated record values. But this will not show the updated values in the form until calling the refresh method. that means it will update the data source form cache only but not existing form control values.
So it is better to call the methods as shown here, like reread and after refresh methods in order to fetch the new / updated values from the data base.

formDataSource.reread()
formDataSource.refresh()


research():Calling research() will rerun the existing form query against the database, therefore updating the list with new/removed records as well as updating all existing rows.

- Harry


November 01, 2012

How to get the current database name in axapta

How to get the current database name in axapta

Here is a small trick to know the name of current data base in axapta.
Axapta supports a class called SysSqlSystemInfo by using this class we can get the current database name...
To do this just create a new job and write following code or you can copy paste from here also.


static void sqlSysName(Args _args)
{
    ;
    info(SysSQLSystemInfo::construct().getloginDatabase());
}

- Harry