Enterprise Portal development (AX 2009)
We Will complete this tutorial in four steps as:
Step 1 – the prerequisites
Step 2 – Understanding proxies
Step 3 – Visual Studio
Step 4 – Debugging in Visual Studio
Step 1 – the prerequisites:
Enterprise Portal must installed on the same server as Your development environment (Visual Studio). If possible, You should also consider to have EP set up on a 32 bit platform – meaning that the OS and Windows Sharepoint Services (WSS) is running in 32 bit mode.In matters of EP development, running on 64 bit platform is the mother of all evil – examples on this will follow…
Enterpise Portal development tools must be installed. This can be done from the installation medias.
Generally the EP dev tools installs EP project- and control templates. Please note that the EP dev tools should be installed after installing Visual Studio 2008 – if not, the VS templates will most likely not be installed correctly. To ensure that the EP dev tools are successfully installed and that the Dynamics AX web project template is available from within Visual Studio, please do the following:
The Web Site project template AxWebProject.zip is installed in My Documents folder under Visual Studio 2008\Templates\ProjectTemplates\Visual Web Developer\CSharp and page and control templates AxWebpartPage.zip and AxWebUserControl.zip under Visual Studio 2008 \Templates\ItemTemplates\Visual Web Developer\CSharp.
If these files are not found under Your user profile, You will have to copy them from the user who installed the EP dev tools.
The Add-in is installed in Program Files\Microsoft Dynamics AX\50\EnterprisePortalTools and is added to the VS Add-in files path and enabled.
- You can check this in VS Tools->Options->Environment->Add-in/macros security, you should see
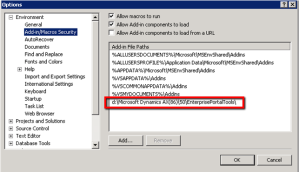
Visual Studio Options dialog
- In VS Tools -> Add-In Manager Dynamics AX Enterprise Portal Tools must be enabled.
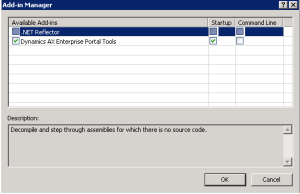
Visual Studio Add In manager dialog
Once this has been verified everything is good to go, but before firing up Visual Studio, You should check in which layer VS connects to AX. VS uses the business connector when connecting to AX. This means that You have to check that the BC is connecting to the layer of Your choice. In my case, we always use the CUS layer. By default the BC connects to AX using the USR layer. If You want to change this do the following:
- On the server where EP is installed, click the “Start” button in Windows. Select “administrative tools” and enter the “Microsoft Dynamics AX Configuration Utility”.
- Change the “Configuration Target” to “Business Connector”.

DAX 2009 Configuration utility
Step 2 – Understanding proxies:
In order to being able to reference common AX types (Objects from the AOT – Classes, tables, methods and enums) AX needs to generate proxies for the objects that You want to use. These objects are defined in the AOT from Web->Web files->Static files->proxies. If You want other objects to be recognized by EP and Visual Studio, You need to edit this file manually. A guide how to do that can be found here:http://msdn.microsoft.com/en-us/library/cc568275(v=ax.50).aspx
To deploy the proxies to EP, please do the following:
- From the Microsoft Dynamics AX menu click Tools -> Development Tools-> Web development -> Proxies.
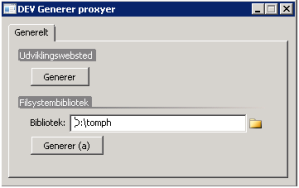
DAX Generate Proxies Dialog
- Using the first option will deploy the proxies to the EP site automatically.
- When using the second option the proxies will be deployed to a folder location of Your choice. From here You will have to copy the new proxies toC:\inetpub\wwwroot\wss\VirtualDirectories\80\App_Code\Proxies
- Remember to also update the proxies from within Visual studio, in order to have VS recognize any of the new objects. From within You project in VS, right click the App_Code node and select “Generate Proxies”. You could also choose to copy the manually from the folder mentioned in the previous step.
Step 3 – Visual Studio
A new user control is easily created by right clicking Your project node and selecting “Add new item”. From the “Add new item” dialog choose “Dynamics AX user control 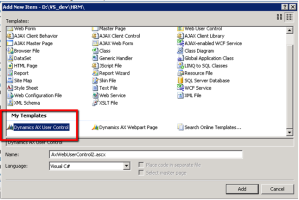
Visual Studio Add new item dialog
In order to add the new user control to the AOT. Right click the control and select “Add to AOT”.
Once added to the AOT changes to the control will automatically be submitted to AX. Once AX recognizes a change AX will update the control automatically on the EP site. However if running in 64 bit mode, this will not work! You can work around this in two ways:
- From a command prompt You can run the D:\Microsoft Dynamics AX\50\Setup\AxUpdatePortal.exe command. (The file may be located elsewhere in Your environment). Running this command will deploy all web related changes to all EP sites.
http://msdn.microsoft.com/en-us/library/dd261467(v=ax.50).aspx - Running the AXUpdatePortal command may be very timeconsuming. You may find it more useful to manually copy Your usercontrol to Your EP site. The default path for the EP site is: C:\Program Files\Common Files\Microsoft Shared\Web Server Extensions\12\TEMPLATE\LAYOUTS\ep. You may want to consider writing a small script to help You automate this process just a little bit.
Step 4 – Debugging in Visual Studio
Ofcourse You will want to be able to debug Your code from within Visual Studio. In order to do so, there are a few things You need to know:- Changes made to your usercontrols are automatically updated at the EP site when running on a 32 bit platform. If running on a 64 bit platform, You will have to update EP manually. The process for doing so is described above.

Visual Studio Debugger Start Options
and fill in the complete url for the page You want to hit on startup. This page is best found by browwing the actual EP site.
In the “use custom server” fill in the base url for the EP site. This can be fetched from within AX by entering administration->Setup->Internet->Enterprise portal->web sites
Common issues
One of the most annoying things about working with EP related development is that You may quite often experience that EP causes Visual Studio to crash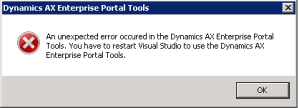
EP Tools causes VS to crash
The only working fix that I know of, is to create a new solution/website and have Your content transferred to that website. When the problem reoccurs the procedure has to be repeated.
-Harry

Amazing information about Open Source Development Services. Open Source Development is best way to increase your online business through attractive website. We have total solution for open source development like Magento, WordPress, Drupal, Zen Cart and many more.
ReplyDeleteGreat information.Thanks for sharing this useful information with all of us.Keep sharing more in the future.
ReplyDeletePortal Development India
I am very glad to get the detailed information of Enterprise Portal development with excellent description from this blog.Its really interesting.
ReplyDeleteWeb Design Bangalore | Web Designing Company Bangalore