X++ string runtime functions
Search This Blog
July 19, 2019
QuickFix-5: X++ string runtime functions
Here is a quick link that describes all the string run time functions in x++.
X++ string runtime functions
-Harry
Follow us on Facebook to keep in rhythm with us. https:fb.com/theaxapta
X++ string runtime functions
Object compare in #MSD365FO
How to compare an AOT object in D365FO.
If you received a project export (.axpp file) and you want to see what's the changes between this file and your current code. While importing this project (from Dynamic 365 menu in VS), right-click on the object and you will get the option to compare this object from your current metadata.
It will open a compare window
where
1 is a model store or your current metadata.
2 is Target file or file from import project
3 is a menu bar with 'Next', 'Previous', 'Expand all' and 'compare code' options.
when you click on 'compare code' option it will open this compare file in the visual studio itself, similar to other compare option.
-Harry Follow us on Facebook to keep in rhythm with us. https:fb.com/theaxapta
July 08, 2019
[Solved] Issue with default app in Windows 10, TWINUI bug
Known Bug in Windows 10,
Error:
All sudden all my default app have been changed to TWINUI and I am not even able to change it.
Solution:
Open Power shell as admin and run below command,
Get-AppXPackage | Foreach {Add-AppxPackage -DisableDevelopmentMode -Register “$($_.InstallLocation)\AppXManifest.xml”}
That's it, now check the default apps again
Also, you can Try below steps for Photo/Images
- Press Windows button + R.
- Type:%appdata%\..\Local\Packages\Microsoft.Windows.Photos_8wekyb3d8bbwe\LocalState
- Delete all the contents of that folder.
- Restart the computer and check if the issue persists.
Thanks
-Harry
Follow us on Facebook to keep in rhythm with us. https:fb.com/theaxapta
July 03, 2019
Working with Data entities in D365FO- Part II
Add new fields on DataEntities/Form from the user interface
Hi Folks,
In this post, I am going to share one new feature which comes with the latest update in #MSD365FO. Now you can add any custom field from the user interface, you don't need to add that in AOI, however, there are some limitation on this but having this option is good where user wants to add some fields on a form/entity which doesn't have any metadata dependency/Relation to other tables. Earlier this feature was limited to talent only now with recent version Microsoft bring this to Dynamics 365 FO as well.
For today’s post lets take an example customer group, You want to add a new field on customer group form. Let's call it ‘SPOC person’. Now to add a new field on a form, you need to personalize the form.
Open Customer group form, go Option menu, ‘select personalize this form’ option.
It will give you another pop-up window, select ‘Add Field’ and grid in the form where you want to add a new field(s).

on the next screen, click on ‘Create new field’
When you click on ‘Create new field’ a new form will open (kind of designer form). First, choose the table where you want to add this field. Select Customer Group here.
and fill other details as below, and hit the save button.
The system will ask for another confirmation
now, this field available to add on the form,
Once you insert this field, it will appear on the form,
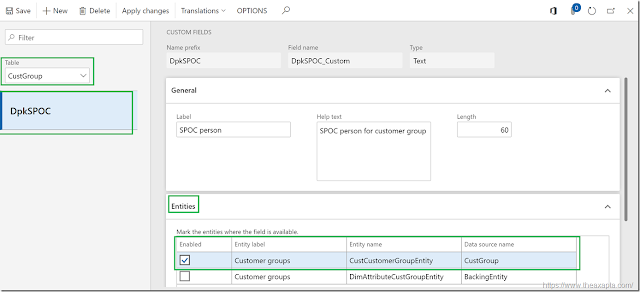
Now go to System Administrator > setup > custom field. Select table from the dropdown list. In the entity tab, select data entity where you want to add this new field. The system will show all the entity where the CustGroup table used.

Now go to data management > Framework parameter > Entity Setting and refresh entity list.
Go to Customer groups entity and click on modify target mapping. Here generate the mapping. On successful completion, your custom field must available in mapping.

Here you go…. that all.
-Harry Follow us on Facebook to keep in rhythm with us. https:fb.com/theaxapta
Subscribe to:
Posts (Atom)


