Showing posts with label #MSDyn365FO. Show all posts

November 13, 2023

Color code the cell in Excel export

Hi Folks, 

Below is a sample code to color code your Excel cell while exporting. In this code, we will be using two assemblies as below

using OfficeOpenXml;
using OfficeOpenXml.Style; 

and standard Excel export code with a bit of creativity, 


You can be more creative by writing separate methods for major colors and calling them based on cell values. 

-Harry Follow us on Facebook to keep in rhythm with us. https:fb.com/theaxapta

October 24, 2023

[Solved]Error while importing/Exporting opening balances DIXF (No active format for data entities has been set up)

Hi Folks, 

We were trying to import some opening balances and encountered some issues which say error as below,  

Error 1:

Results. The account type Ledger is not valid
Results. Validations failed

Error 2:

Results. No active format for data entities has been set up.
Set up an active format for each dimension format type.
Results. Error found when validating record.
Data written to target 'General journal' ('0' records created, '0' records updated)


Solution:

To fix this issue, Navigate to the below form

"General ledger > Chart of accounts > Dimensions > Financial dimension configuration for integrating applications"

Now here you need to set up two records as below, please make a note of the 'Dimension format type' and select the required dimension from available dimension types. 


Save your changes and retry to import/export your file, it should work this time. 

If you want to learn more about this specific form, I would recommend reading below Microsoft document.


-Harry Follow us on Facebook to keep in rhythm with us. https:fb.com/theaxapta

September 06, 2023

Supercharging Dynamics 365 F&O implementation with Azure DevOps

Hi Folks, 

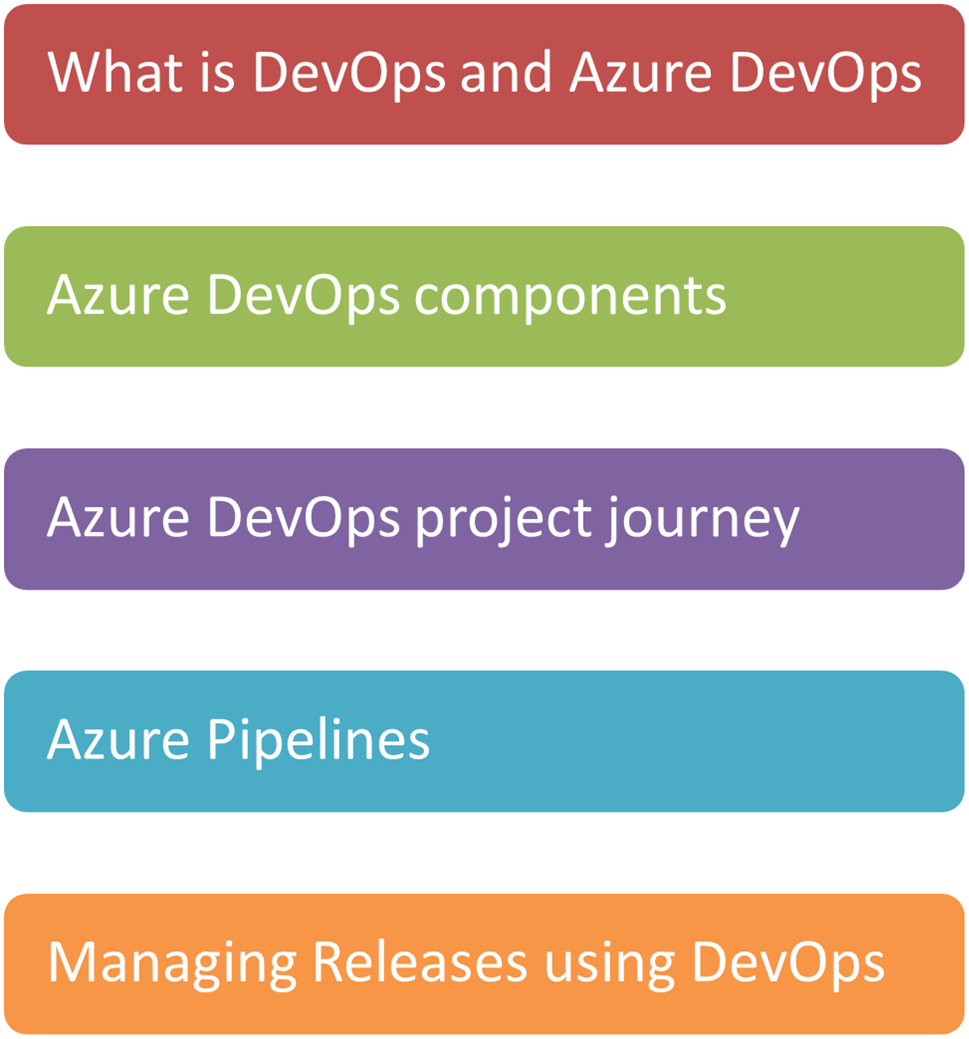
Here is the recording of the session delivered on 31st August, it primarily targeted below topics, 


and of course an interactive demo around those topics, 


-Harry Follow us on Facebook to keep in rhythm with us. https:fb.com/theaxapta

July 03, 2023

A complete Guide - Configuring Power BI in Dynamics 365 Finance and Operations (D365FO)

Introduction:

Power BI is a powerful business intelligence tool that enables users to visualize and analyze data from various sources. When integrated with Dynamics 365 Finance and Operations (D365FO), Power BI can provide insightful reports and dashboards, empowering organizations to make data-driven decisions. In this blog post, we will walk you through the process of configuring Power BI in D365FO, allowing you to harness the full potential of these two Microsoft tools.

There are many default Power BI report available, and you can also develop and integrate your own reports. Let's follow the below steps to configure this in a Tier 2 environment as Microsoft doesn’t support Tier 1 environments for Power BI anymore.

Step 1: Accessing the Power BI service:

To begin the configuration process, you need to have access to the Power BI service. Visit the Power BI website (https://powerbi.microsoft.com/) and sign in using your Microsoft account credentials. Make sure you use the same account for all the below steps as well.

Step 2: Register the Power BI application:

In the Power BI configuration form, click on the "Register new app" button. This step will prompt you to sign in with your Power BI account credentials and authorize D365FO to access your Power BI resources. Check this post for step by step guide for app registration.

Once the app is registered you need to enable below API permission, 

I. Content :

Content. Create

II. Dashboard

Dashboard.Read.All

III. Dataset

Dataset.Read.All

Dataset.ReadWrite.All

IV. Report

Report.Read.All

V. Workspace

Workspace.Read.All

Step 3: Grant Permissions in Power BI Service:

Switch back to the Power BI service and navigate to "My workspace" or the desired workspace where you want to embed D365FO reports. Click on "Settings" and then "Admin portal." In the admin portal, select "Workspace settings" and choose the workspace where D365FO reports will be embedded. Under "Members," add the D365FO user account or security group that requires access to the Power BI reports.

Step 4: Setup Power BI Integration in D365FO:

In the D365FO environment, navigate to System Administration > Setup > Power BI configuration. Enable the Power BI integration by checking the "Enable Power BI Integration" checkbox.

Add application id and client secrete id which you got from App registration. Do the authentication on Power BI.

Step 5: Deploy Power BI Reports in D365FO:

Navigate to System Administration > Setup > Deploy Power BI files. Select your required report and on the top action pane, select ‘Deploy Power BI file’. You may get an error like below

‘Deployment failed for <Report Name>’, this is because you didn’t log in to PowerBI.com yet. Please follow step 1 and validate if you are able to see  ‘My workspace’ at the bottom left of the screen.

Step 7: Embed Power BI Reports in D365FO:

In D365FO, open the desired workspace where you want to embed the Power BI report. Click on "Options" and select "Personalize this form." Edit the form and add a Power BI tile to the desired location. Provide the "Report URL" or "Dashboard URL" for the Power BI report you want to embed. Additionally, you can specify filters and parameters based on your requirements.

You may get an error on the workspace similar to below

QueryUserError

To fix this issue you need to make sure the respective entity store is refreshed successfully. If you are facing an issue with the refresh, check out this post. 


Step 8: Save and Publish the Changes:

Save and publish the changes made to the form in D365FO. The Power BI report tile will now be visible to users in the designated workspace, allowing them to access and interact with the embedded reports.

Conclusion:

Configuring Power BI in Dynamics 365 Finance and Operations opens up a world of data analysis and visualization possibilities. By following these step-by-step instructions, you can seamlessly integrate Power BI with D365FO, enabling your organization to leverage insightful reports and dashboards to make informed decisions. Remember to ensure appropriate permissions and access control settings to maintain data security and governance. With Power BI and D365FO working together, you can unlock valuable insights and drive business success.


-Harry Follow us on Facebook to keep in rhythm with us. https:fb.com/theaxapta

June 09, 2023

How to add security on a specific control on form

Hi Folks, 

In this post, I will discuss how to enhance security for a specific form control, such as a button or checkbox. Typically, we would use the DisplayMenuItem feature to manage security privileges. However, things can become a bit different when you want to assign special security privileges to a particular form control.

Here's a standard approach to achieving this. Please follow the steps below:

1.              Begin by navigating to the form design and selecting the desired form control to which you want to add additional security privileges.

a.     Set the property 'Need permission' to 'Yes'. This step will make the field available in Step 5.

2.         Create a new privilege. If an existing one suits your requirements, feel free to use it.

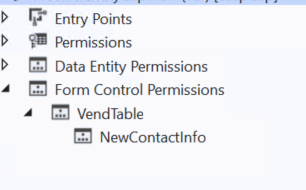
3.         Within the privilege settings, locate the 'Form control permission' section.

4.         Add a new form here.

5.         Include the control on this form and adjust its properties accordingly.

By following these steps, you can implement enhanced security measures for specific form controls.


-Harry Follow us on Facebook to keep in rhythm with us. https:fb.com/theaxapta

June 06, 2023

Simplifying Data Retrieval with D365FO X++ Lookup Method

Simplifying Data Retrieval with D365FO X++ Lookup Method

Simplifying Data Retrieval with D365FO X++ Lookup Method

Introduction

Microsoft Dynamics 365 for Finance and Operations (D365FO) is a powerful ERP system that offers robust customization capabilities. One such customization option is the ability to write X++ code for lookup methods. These methods can greatly simplify data retrieval and enhance the user experience within the application. In this blog post, we will explore the lookup method in D365FO X++ code and provide a sample code snippet to demonstrate its usage.

Understanding the Lookup Method

The lookup method in D365FO X++ code allows developers to retrieve data from related tables or data sources based on specified criteria. It enables users to select a value from a predefined set of options, providing a seamless way to populate fields with accurate and relevant information. The lookup method essentially acts as a search functionality within the application, making it easier for users to find and select the desired data.

Sample Code

    
public static void lookupDemo(FormStringControl _control)
{
    SysTableLookup        sysTableLookup;
    QueryBuildDataSource  queryBuildDataSource;
    QueryBuildRange       queryBuildRange;

    sysTableLookup = SysTableLookup::newParameters(tablenum(CustTable), _control);
    queryBuildDataSource = sysTableLookup.addDataSource(tablenum(CustTable));

    // Adding a range to filter the lookup results
    queryBuildRange = queryBuildDataSource.addRange(fieldNum(CustTable, AccountNum));
    queryBuildRange.value("1001");  // Setting the filter value

    sysTableLookup.performFormLookup();  // Opening the lookup form
}


Explanation

In the above code, we start by creating a new instance of the SysTableLookup class, passing the target table and the control where the lookup will be displayed as parameters. In this case, we use the CustTable table and the _control argument, which represents the form string control.

Next, we add a data source to the lookup using the addDataSource() method. Here, we specify the table we want to retrieve data from (in this case, CustTable).

To filter the lookup results, we add a range using the addRange() method on the queryBuildDataSource. In this example, we filter the results based on the AccountNum field and set the filter value to "1001".

Finally, we call the performFormLookup() method on the sysTableLookup object, which opens the lookup form for the user to select the desired value.

Conclusion

The lookup method in D365FO X++ code provides a convenient way to retrieve and display data from related tables or data sources. By implementing lookup functionality, developers can enhance the user experience by simplifying data selection and ensuring the accuracy of entered values. The code snippet provided above serves as a starting point for utilizing lookup methods in your D365FO customization projects. Experiment with different tables, filters, and fields to tailor the lookup functionality to meet your specific business requirements.

-Harry Follow us on Facebook to keep in rhythm with us. https:fb.com/theaxapta

April 30, 2023

Azure Key vault parameter setup in D365FO

Hi Folks, 

In this post, I am going to share how to configure Azure key vault parameters in Dynamics 365 Finance and Operations  (Let's call it FinOps until we have a new name from Microsoft :) ).

First, let's understand what the use of this form is, This is primarily used for integration scenarios where a business needs to save sensitive data like security keys or certifications and a functionality or application working with this data must support data encryption, working with certificates, etc. As the cloud version of Microsoft Dynamics 365 for Finance and Operations doesn't support local storage of certificates, customers need to use key vault storage in this case. The Azure Key Vault provides the opportunity to import cryptographic keys, and certificates to Azure, and to manage them.


Now let's see some prerequisite steps, 

1. Create a key value on the Azure portal and note the Value URI. This is available on the overview tab.

2. Add your certificate, Secrate, and keys.
3. On the Azure portal, do an app registration and store the client Id and secret key.  
4. Now navigate to D365FO > System admin > Setup > Key Vault Parameters
5. Create a new record and fill below details


6. On the certification tab, add below for each certificate 
Name
Description
Secret – Enter a secret reference to the certificate in the below format
vault://<KeyVaultName>/<SecretName>/(Version if any)
Secret Type: Certificate

7. Click on Validate button to check the setting. 

That is all, now you should be able to access this certificate in your code, here is a sample code to access the certificate, 

public class TheAxaptaAccessKeyVault
{
    public static void main(Args _args)
    {
        KeyVaultCertificateTable    kvcTable;
        str                                        value

         kvcTable  = KeyVaultCertificateTable::findByName("TestKeyVault");
        value         = KeyVaultCertificateHelper::getManualSecretValue(certTable.RecId);

        info(value); //This will give you stored in the certificate. 
}

Cheers!!!

-Harry Follow us on Facebook to keep in rhythm with us. https:fb.com/theaxapta

April 12, 2023

Unable to restore database into DEV/Tier-1 instance

Hi Folks, 


When trying to restore a DB backup (.bak file) to one of the DEV boxes I was getting a strange error (initially it was strange :) ). The backup file was the size of about 50GB and I have disc space available of about 400GB but still, system was reporting issues for size. 


Possible reason: When we create a backup from SQL management studio, it contains only the used data pages and the backup file can be compress, while the actual database can be much larger then the backup file itself.

Solution: To verify the actual size of database, you can right-click on the database (at source) and check the properties, you will get the actual size of the Database itself. Now when you have the required size details with you, just make sure you have the space available in target system. 
Now, as the dev box is hosted on your Azure subscription, you have much more control over this. You can change the disk size from Azure portal. 

Cheers!!!
-Harry 

Follow us on Facebook to keep in rhythm with us. https:fb.com/theaxapta

March 04, 2023

QuickFix: Set default browser in Visual studio for debugging

Introduction:
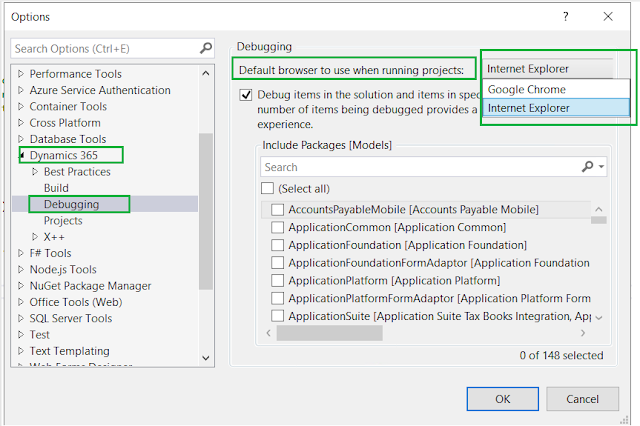
In the realm of Dynamics 365 development, encountering issues when debugging and finding that Visual Studio opens objects in Internet Explorer (IE) can be quite frustrating. Although Microsoft no longer officially supports IE, this peculiar behavior persists. Fortunately, there is a simple solution: changing the default browser within Visual Studio. In this blog post, we will guide you through the steps to configure your preferred browser, such as Chrome, for seamless debugging in Dynamics 365.

Step 1: Navigating to Visual Studio Extension
To begin, open Visual Studio and access the "Extensions" menu.

Step 2: Dynamics 365 Extension Options
Within the "Extensions" menu, locate and select the "Dynamics 365" extension. This will open the options panel specific to Dynamics 365 development.

Step 3: Debugging Configuration
Within the Dynamics 365 extension options, find and select the "Debugging" section.

Step 4: Modifying Default Browser
In the Debugging section, you will find the option to modify the default browser used for object debugging.

Step 5: Set Preferred Browser
Choose your preferred browser, such as Chrome or any other compatible browser, as the default option for object debugging.


Conclusion:
By following these simple steps, you can easily resolve the issue of Visual Studio opening objects in Internet Explorer during debugging sessions in Dynamics 365. Take control of your debugging experience and choose a browser that aligns with your preferences and development requirements.

Happy debugging and seamless development!

#VisualStudio #Dynamics365 #Debugging #Development #BrowserConfiguration

-Harry Follow us on Facebook to keep in rhythm with us. https:fb.com/theaxapta

February 04, 2023

QuickFix: [Solved] SSRS Report Deployment failed - The number of defined parameter is not equal to the number of cell definitions in the parameter panel

While duplicating an SSRS report for customization sometimes you may face this error at the time of report deployment. 

Error Message:
"SSRS Report Deployment failed - The number of the defined parameters is not equal to the number of cell definitions in the parameter panel."

Solution

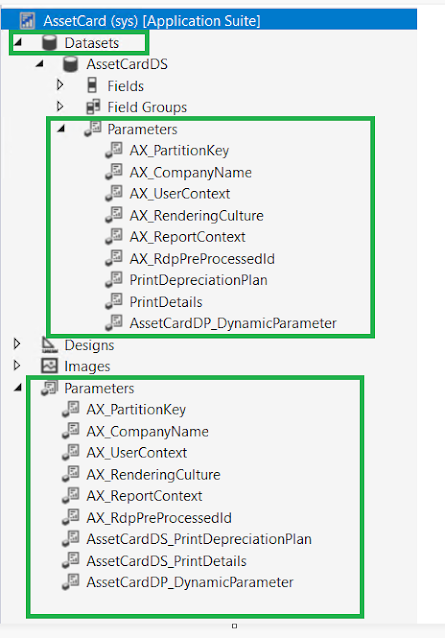
The first thing you need to check for any extra parameter is this report, compare with the standard report. There are two places you need to compare
1. DataSet parameters
2. Report Parameter


There might be an extra parameter(s), try to remove this extra parameter from the report. In case you are unable to delete it from the front end you need to open the report in XML (Right-click on the report in solution and select open with > Open with XML Text editor).

In the XML file search for this parameter and carefully remove it from everywhere. If you are not familiar with XML better to take help. Save your changes and build the solution. This time your report should be deployed without any error. 


-Harry Follow us on Facebook to keep in rhythm with us. https:fb.com/theaxapta

January 10, 2023

[Solved] Issue with Database import in Dev Box

[Updated on 19 Oct, 2023]
Hi Folks, 

While trying to import the UAT database into the dev box or any other tier-1 box (You might have tried this MS document), 

*** Changes to connection setting default values were incorporated in a recent release.  More information is available at https://aka.ms/dacfx-connection
*** Error importing database: Could not import package.
Changes to connection setting default values were incorporated in a recent release.  More information is available at https://aka.ms/dacfx-connection
Unable to connect to target server 'localhost'. Please verify the connection information such as the server name, login credentials, and firewall rules for the target server.
A connection was successfully established with the server, but then an error occurred during the login process. (provider: SSL Provider, error: 0 - The certificate chain was issued by an authority that is not trusted.)
The certificate chain was issued by an authority that is not trusted.
*** The settings for connection encryption or server certificate trust may lead to connection failure if the server is not properly configured.


That's because of recent changes in encryption policies on SQL. To fix this issue you need to update the import SQL command below

SqlPackage.exe /a:import /sf:J:\MSSQL_BACKUP\UATbackup.bacpac /tsn:localhost /tdn:AXDB_UAT /p:CommandTimeout=1200 /TargetEncryptConnection:False

Update on 19 Oct, 2023:

Now you have to use the new parameters below 

SqlPackage.exe /a:import /sf:J:\MSSQL_BACKUP\UATbackup.bacpac /tsn:localhost /tdn:AxDb_UAT /p:CommandTimeout=1200 /TargetUser:"axdbadmin" /TargetPassword:"<DB adm pwd>" /TargetTrustServerCertificate:True

-Harry Follow us on Facebook to keep in rhythm with us. https:fb.com/theaxapta

December 13, 2022

Validate financial dimension combination

Hi Folks, 

Often we need to create Journals via X++ code as part of customization or integration and dimension is always the tricky part of this. How to validate the dimension combination value as per rules set in the system. 

I am sharing a code sample to do the same, check this code and you may need to replace some dimension names or add/remove dimensions as per your requirement. The below code sample will validate

1. Main account 
2. Individual dimension value 
3. Deactivated dimension values
4. Dimension combination 


-Harry Follow us on Facebook to keep in rhythm with us. https:fb.com/theaxapta

November 11, 2022

Useful links for OData and Rest API integration

Here are some handy links for D365FO integration with OData or using Rest API, 


-Harry Follow us on Facebook to keep in rhythm with us. https:fb.com/theaxapta

August 22, 2022

Azure DevOps Demo data generator

Hello,

Microsoft recently released a tool to generate demo data for your Azure DevOps project, 

You can get detailed steps here (Get started creating and populating demo Azure DevOps Services projects).


-Harry Follow us on Facebook to keep in rhythm with us. https:fb.com/theaxapta

August 05, 2022

Create Code extension in D365FO

Hi Folks, 

In case you missed this, Microsoft recently added one more option in Visual Studio to create an extension 'class' of any object (not as an object extension but an extension class to add code/new method).

Navigate to 'Application explorer' (aka AOT) and find your object, right click on this and you will find an option to 'Create code extension', if you select this, it will create a class with all syntax you need to create an extension of that object (i.e. final keyword, add 'ExtensionOf' at the top).


This action will create a class with the name 'ObjectName_Model_Extention' in your project with the below syntax, 


This is super quick to create an extension call for any applicable object. (Yeah you can not create an extension on an EDT using this option ;) )

Cheers!!! Happy Weekend. 

-Harry Follow us on Facebook to keep in rhythm with us. https:fb.com/theaxapta

July 24, 2022

[Solved] Debugger not working, Symbols not loaded

Hi Folks, 

In the recent Dev box where we are getting Visual Studio 19  for IDE, the debugger is not so friendly, it could be demanding to favor you  :) .

Let's see what are those demands, you may or may not need all those fixes. 

1. Uncheck  "Load Symbols Only For Items In The Solution". Go to Extension > Dynamics 365 > Option >


2. Uncheck ‘Enable Just My Code’. Go to Extension > Dynamics 365 > Option


and Check the "Microsoft Symbol Server"


-Harry Follow us on Facebook to keep in rhythm with us. https:fb.com/theaxapta

April 20, 2022

Table event methods

Hello, 

Here are quick examples of the most important event methods on a table,


I will be posting a video to explain this in Hinglish. Please stay tuned to my YouTube channel 


-Harry Follow us on Facebook to keep in rhythm with us. https:fb.com/theaxapta

March 21, 2022

Useful commands to manage models

Export model -


ModelUtil.exe –export –metadatastorepath= packages path  –modelname="ur model name" –outputpath="where the model is to be saved"


Example : ModelUtil.exe –export –metadatastorepath=K:\AosService\PackagesLocalDirectory –modelname="Model1" –outputpath="D:\BackupModel"


Import model -

ModelUtil.exe -import -metadatastorepath=packages path -file="path where u want to save with model name"

example : ModelUtil.exe -import -metadatastorepath=K:\AosService\PackagesLocalDirectory -file="C:\TheAxapta\Dev_To move\Model1.axmodel"


Delete -

ModelUtil.exe -delete -metadatastorepath=package path  –modelname="name of ur model to delete"

example : ModelUtil.exe -delete -metadatastorepath=C:\AOSService\PackagesLocalDirectory –modelname=Model1


-Harry Follow us on Facebook to keep in rhythm with us. https:fb.com/theaxapta

February 16, 2022

[Solved] Application login redirects to other domain than customer's domain #MSD365FO

[Last updated : 25 August 2022]
Hi Folks,

Recently I was facing an issue with one of the customers, whenever any user is trying to login into any environment the login screen redirects to another domain than the customer's domain. 

After doing a bit of research and connects, I figured out that while deploying this tier-1 environment I have used my email id (which was not part of the customer domain). And system took my domain as the default tenant and ignored which azure connector was used to deploy this environemnt. 

Solution: You have to use the customer's domain email to deploy any environment on their LCS so it will take their domain as default tenant than your(Partner/Vendor) tenant. 

Now, this issue becomes more critical in case you rolled out a tier-2 or UAT instance (I haven't tied this but technically this can also happen), and non of the users can log in to this and you will end up, redeploying this from scratch. Imagine the scenario where your team already did the configuration on any of these servers and you end up redeploying, A complete mess. and a lot of rework. 

However DB backup and DIXF export can cover you there, but again a lot of rework and time is needed. Plus justify this to your customer. 

So, always use the customer's domain email id to deploy any environment for your customer. 

If this issue might have been raised a few months back, I could have used the AdminUser provisioning tool (How to set new admin user) to change it, but with the recent update, this tool is deprecated. (Yeah I also didn't like this idea).

Hope this will help and save you from ending up in a similar mess. 


For more details pl check this link


Update: 25 August 2022, 

If you have some old Dev VM you can actually copy the admin provisioning tool from there and paste it into the new vm at the same location. This should help you as a workaround to set new admin to dev boxes. 

Cheers!!!

-Harry 

Follow us on Facebook to keep in rhythm with us. https:fb.com/theaxapta

December 03, 2021

[Solved] Your connection is not private, issue while browsing DEV box

Hi Folks, 

In case of this sunny morning, you tried to login into one of the dev box which you accessing after a long back you may get the below error on the browser 

Your connection is not private

Attackers might be trying to steal your information from


This issue was caused because of the expired SSL certificate on the server, as these VM are azure hosted and Microsoft takes care few things on their own, hence this once. To fix this, you need to log into LCS and select the project and the cloud hosted environment. 


Under maintain tab, select rotate certificate, 


Select Rotate SSL certificate (NOTE: This will restart your VM, pl save any of your work before performing this action.)


It may take some time to complete this action, you can monitor the progress on the right top corner of the environment page. Sometimes, the screen doesn't refresh automatically, you may need to refresh the browser after a few mins. This action normally takes 45 min.   

Once that is done and your environment is showing up and running on LCS you can try to access it. 


-Harry Follow us on Facebook to keep in rhythm with us. https:fb.com/theaxapta