Showing posts with label DIXF & DMF. Show all posts

June 07, 2024

[Solved] Dynamics 365FO DB restore error Line 1 The permission 'KILL DATABASE CONNECTION' is not supported in this version of SQL Server.

Important Note: Microsoft frequently updates SqlPackage. Therefore, it’s crucial to download the latest version of SqlPackage each time you intend to use any of its commands. Download the latest SQLPackage.

Error Details: The error message for BacPac DB restore is as follows:

Dynamics 365FO DB restore error Line 1 The permission ‘KILL DATABASE CONNECTION’ is not supported in this version of SQL Server. Alternatively, use the server level ‘ALTER ANY CONNECTION’ permission.


Dynamics 365FO DB restore error Line 1 The permission 'KILL DATABASE CONNECTION' is not supported in this version of SQL Server. Alternatively, use the server level 'ALTER ANY CONNECTION' permission.

Recommended solution: 

Step 1: Navigate to the folder where your BACPAC file is saved and change the file extension from .bacpac to .zip.

Step 2: Open the zip file and copy the model.xml file to a different location. Open the copied file in a text editor such as Notepad, VS Code, or Visual Studio. (Avoid editing the file directly in the zip folder or the original file).


Model file may not load in notepad, I would prefer to open this into VS code, Visual Studio itslef or Notepad ++, 


Step 3: In the copied model.xml file, find and delete the entire Element tag that contains “Grant.KillDatabaseConnection”. Save the modified file as ModelCopy1.xml.


Step 4: Copy the modified file (ModelCopy1.xml) and paste it into the SqlPackage folder. (Download the latest version of SQLPackage)


Step 5: Change the file extension of the zip file back to .bacpac (reverse of Step 1).

Step 6: Go to the downloaded SQLPackage folder and execute the following command:

SqlPackage.exe /a:import /sf:J:\MSSQL_BACKUP\PreProdDB.bacpac /tsn:localhost /tdn:AxDB_PreProd2005 /p:CommandTimeout=1200 /TargetUser:"axdbadmin" /TargetPassword:"<DbPassword>" /TargetTrustServerCertificate:True /mfp:"ModelCopy.xml
DB import should be successful this time. 

-Harry Follow us on Facebook to keep in rhythm with us. https:fb.com/theaxapta

April 12, 2024

QuickFix: "Value cannot be null. Parameter name: proxy" in DIXF

Problem: After creating a new data entity and refreshing the entity list, the new entity doesn’t appear in DIXF data entity list. Interestingly, no errors are encountered when compiling the project. However, the following error message was received when trying to add the data entity in list manually. 

Value cannot be null. Parameter name: proxy


Possible Reason: While building your project or solution exclusively, your code may not exhibit any issues. However, inspect the output window messages in Visual Studio to identify any error messages originating from objects not included in your code.

Proposed Solution: Attempt to build the entire model and rectify any errors. Upon successful build, perform a database synchronization and try again. You should then be able to view new entities after refreshing or manually add them to the list.

-Harry Follow us on Facebook to keep in rhythm with us. https:fb.com/theaxapta

October 24, 2023

[Solved]Error while importing/Exporting opening balances DIXF (No active format for data entities has been set up)

Hi Folks, 

We were trying to import some opening balances and encountered some issues which say error as below,  

Error 1:

Results. The account type Ledger is not valid
Results. Validations failed

Error 2:

Results. No active format for data entities has been set up.
Set up an active format for each dimension format type.
Results. Error found when validating record.
Data written to target 'General journal' ('0' records created, '0' records updated)


Solution:

To fix this issue, Navigate to the below form

"General ledger > Chart of accounts > Dimensions > Financial dimension configuration for integrating applications"

Now here you need to set up two records as below, please make a note of the 'Dimension format type' and select the required dimension from available dimension types. 


Save your changes and retry to import/export your file, it should work this time. 

If you want to learn more about this specific form, I would recommend reading below Microsoft document.


-Harry Follow us on Facebook to keep in rhythm with us. https:fb.com/theaxapta

November 11, 2022

Useful links for OData and Rest API integration

Here are some handy links for D365FO integration with OData or using Rest API, 


-Harry Follow us on Facebook to keep in rhythm with us. https:fb.com/theaxapta

April 01, 2021

How to get meta data of an Data Entity MSDynD365

Hi Folks,

Here we got one awesome update on D365FO data management, now you get metadata of any data entity in a very useful format in an excel file.  You will get the below information for each data entity.


Let's see how to get that, go to the "Data management" workspace and click on the "Data entity" tile.
Select your data entity and in the menu bar select the "Get metadata" button.


The system will download the metadata in an excel file even for any custom field or entire custom data entity, pl find below a sample file for the Vendor Group.

Cheers!!!

-Harry Follow us on Facebook to keep in rhythm with us. https:fb.com/theaxapta

October 05, 2020

QuickFix -15:[Solved] Error The data value violates integrity constraints.

Getting below error while importing a file using the Data management framework. 

Issue: 

"The data value violates integrity constraints"

Possible solution: 

Check two things primarily. 

1. If any mandatory fields are blank in file

2. Set if a unique filed contain duplicate values in file.


-Harry Follow us on Facebook to keep in rhythm with us. https:fb.com/theaxapta

July 02, 2020

[Solved] Issue with data entity EcoResReleasedProductCreationV2Entity - Error executing code. The field with Id '0' does not exist in table 'InventTableModule

Hi Folks,

There are two data available in system EcoResReleasedProductV2Entity and EcoResReleasedProductCreationV2Entity with a similar appearance. Let’s first understand the use of each, To create release products in the system user has to use EcoResReleasedProductCreationV2Entity while updating release products user have to use EcoResReleasedProductV2Entity.

Now let's discuss the error which I was facing while using EcoResReleasedProductCreationV2Entity data entity to create release product. Below is the error message.

"Result: Error executing code. The field with Id '0' does not exist in table 'InventTableModule'. "

Now to fix this issue you need to install one hotfix in your system which is suggested by Microsoft. Go to your LCS project and search for KB4559650, 


now you have to install this KB on your machine. On successful deployment, you should be able to use this data entity to release product import.

Cheers!!!

-Harry Follow us on Facebook to keep in rhythm with us. https:fb.com/theaxapta

September 02, 2019

Set up MT940 format for bank reconciliation #MSD365FO

Hi Folks,

In D365FO advance bank reconciliation is a feature to import bank statement file and automatically reconcile with related bank accounts. There are many formats which a bank commonly used i.e. ISO20022, MT940, BAI2.

In this post, we will see how to set up the MT940 format which is commonly used in most banks nowadays.

Let's get started.

Step 1: Get sample entity template and transformation files
To transform the source file into FnO format, you need few files and these are available under 'Resources' node of AOT. Files names are as below


Step 2: Create an import project
Under Data management workspace, create an import project with name MT940. Add a new file with below details
I. Entity Name: Bank statements
II. Upload file name: SampleBankCompositeEntity (which you got from Resource node)


Once file successfully uploaded, click on view map. On next screen select BankStatementDocumentEntity from the list and click on 'View Map' and go to 'Transformation' tab. Click new and click upload file, select different XLST file one by one, in the sequence shown in below image.


Step 3: Setup Bank statement format
Navigate to Cash and Bank management > Setup > Advance bank reconciliation setup > Bank statement format.
Here create a new record as below


Step 4: Configure the bank account to use Advance reconciliation option
Navigate to Cash and Bank management  > Bank accounts. Select a Bank account to view details. Under Reconciliation tab,
I. Set the 'Advance bank reconciliation' option to 'yes'. This is a one-time setup, the system doesn't allow to undo/change once set to yes.


II. Set Statement format field to format which we have created in step 3 i.e. MT940


Step 5: Testing
Navigate to Cash and Bank management  > Bank accounts. On Reconcile tab click on Bank statements.
On the next screen click on Import statement. A dialog will pop up. Fill/select details as below

I. Import statement for multiple bank account in all entities. : Set this as Yes if your file contains more than one bank accounts.
II. Bank Account: If the source file contains a single bank, select that bank here.
III. Statement Format: Select your statement format here it must be MT940.
IV: Bank statement file import: Select source file and click upload.
V: Click ok and it must import transaction in the current form.

Note: After every DB refresh you need to redo import project. DB will break the links and you need to remove the entity from your import project and add upload the transformation files accordingly.

-Harry Follow us on Facebook to keep in rhythm with us. https:fb.com/theaxapta

PS: This post referred to MS documentation. 

July 03, 2019

Working with Data entities in D365FO- Part II

Add new fields on DataEntities/Form from the user interface


Hi Folks,

In this post, I am going to share one new feature which comes with the latest update in #MSD365FO. Now you can add any custom field from the user interface, you don't need to add that in AOI, however, there are some limitation on this but having this option is good where user wants to add some fields on a form/entity which doesn't have any metadata dependency/Relation to other tables. Earlier this feature was limited to talent only now with recent version Microsoft bring this to Dynamics 365 FO as well.

For today’s post lets take an example customer group, You want to add a new field on customer group form. Let's call it ‘SPOC person’. Now to add a new field on a form, you need to personalize the form.
Open Customer group form, go Option menu, ‘select personalize this form’ option.


It will give you another pop-up window, select ‘Add Field’ and grid in the form where you want to add a new field(s).


on the next screen, click on ‘Create new field’


When you click on ‘Create new field’ a new form will open (kind of designer form). First, choose the table where you want to add this field. Select Customer Group here.


and fill other details as below, and hit the save button.


The system will ask for another confirmation


now, this field available to add on the form,


Once you insert this field, it will appear on the form,


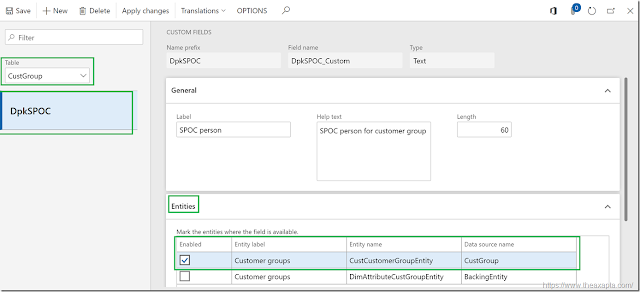
Now go to  System Administrator > setup > custom field. Select table from the dropdown list. In the entity tab, select data entity where you want to add this new field. The system will show all the entity where the CustGroup table used.


Now go to data management > Framework parameter >  Entity Setting and refresh entity list.

Go to Customer groups entity and click on modify target mapping. Here generate the mapping. On successful completion, your custom field must available in mapping.


Here you go…. that all.

-Harry Follow us on Facebook to keep in rhythm with us. https:fb.com/theaxapta

May 27, 2019

Working with Data entity in D365FO - Part I

Hi Folks,

In this post let’s see how to add custom and virtual fields on Data entities. This approach will work on both standard and custom entities. I will show you both scenarios. When adding new fields on a new entity, steps are very simple and all you need to add business logic in the respective data entity methods to work with the export and import process.

Custom field: When adding new fields in standard application entity like Customers (CustCustomerV3Entity), Vendors (VendVendorV2Entity), Customer groups(CustCustomerGroupEntity).

Virtual fields: Fields which doesn’t exist in a table but require to fetch any other table field. For example, assume we have purchase requisition records from another system which needs to import in Dynamics 365 FO. In source data, we have also had delivery address (string) which needs to insert into PurchReqLine table’s DeliveryPostalAddress(RefREcId) field. So we need to add a virtual field name as DeliveryAddress(string) and in code need to take this string values and create address at run time, use generated rec id to pass in PruchReqLine table. 


In part one post, let’s see how to add new fields(table fields) on standard data entity’s extension. Here is the scenario, the client wants me to add new fields in the vendor group, to capture a unique reference number from their another system. Let's call it ‘SAPVendGroup’.  
1.       Create an extension of table VendGroup, and add a new string field name it SAPVendGroup.


You need to build/DB synch to get these fields in reference objects.
2.       Create an extension of VendVendorGroup data entity and drag and drop a new field from Data source to Entity fields.


3.       Create an extension of VendVendorGroupStaging table, add new field here as well.
4.       Build your solution and DB synch.

5.       Now try to export and import.

In the next post, we will see how virtual fields work with data entities. 

-Harry Follow us on Facebook to keep in rhythm with us. https:fb.com/theaxapta

December 21, 2018

How to set default fields to be available while using Excel add-ins

Hi Folks,
As we know D365FO comes with a powerful architecture for all integration using DIXF. Data entities are the only way (in most of the cases) to communicate with D365FO through an external system.
In today’s post, I’m going to share a quick tip on how to set default fields to be made available while using Excel add-ins for CRUD operation. Yes, now you can use excel add-ins to perform all CRUD operation on a user interface. Let's take the example of customer master.
Below screenshot shows how to access excel add-ins on customer master. Go to Customer master and on right-hand side upper corner, you may found Office icon. Click on it and select
image

It will show you all the data entities which are available in the system based on customer (CustTable) as the main data source. Select the first one,
image

and it will open an excel sheet with Dynamics Add-ins. You might need to sign in using a valid user which have access to D365Fo application. Excel must look like below with a Dynamics add-ins in left.

image

You can perform all CRUD operation here and hit publish button on the left down side to publish your changes to the server. That’s it.
Now coming to the title of this post, (it's not too late Winking smile ) if you want to make any changes on these fields, like remove and add new or want to change the order, here is the trick.
Go to visual studio, open the data entity (in this case you need to create an extension of this entity). Go to field group > AutoReport. Here you must get all field which is showing on excel. You can do addition, delete, change the order of fields and that’s it. Once successful build changes will reflect when you use excel add-ins next time.

Cheers,
Harry

July 08, 2018

Import Data Packages through LCS

Hi Folks,

In my last post, we discussed how to create default data packages through the Asset library. LCS is really a good tool to manage your Dynamics project. Today we will discuss one more tool Configuration and Data manager.

Demo 1:
In the first demo, we will see how to import a single data package.

Step 1. Login in LCS. Select your project.
Step 2. Got to configuration and Data management tool. Below is the landing page
1
here 1. Menu tile, to perform operations
2. Available list of data packages
3. Package details and version
4. List of entities in selected package (its blank here cause of my environment. )

Step 3. Select a package from the grid ( section 2) and click on apply (section 1). The system will ask for destination environment,
2

Step 4: Once you select a destination environment, now you have to select the company (legal entity) where you want to import this data package.
image
Select the company and hit the Apply button.

Step 5: Now you go back to your environment and navigate to Data management workspace. You can see a new project created under Data management to import this data package. You can also track the job from the same screen.

Demo 2:
The above demo applicable for single data package import. You can also select multiple data packages and import them in both Concurrently and sequentially.  Let's see how…

Step 1: Select multiple data projects (all package must belong logically same module/group)
3

Step 2: Click on Apply button and select the first option – ‘Apply concurrently’. On next screen give a tag name.
Step 3: Repeat step 3 to 5 from Demo 1.

If you select the other option ‘Apply sequentially’, the immediate next screen will ask for a sequence of data packages,
image

However, the system will give you default sequence based on name and entity contained. You can update the sequence of each package manually as well.
4

Once you set the sequence, rest steps are the same as the previous import.

I personally found this tool really helpful when a developer really need some test/setup data while development and they can not go back and forth to get dummy data. If the functional team have data in templates/Packages simple you can apply them to any dev/test box.

Try it and share your feedback.

Cheers
Harry…

June 30, 2018

How to create default Data packages Dynamics 365 FO

Hi Folks,

Now we all know how powerful and useful is LCS for Dynamics 365 projects. There are a lot of tools to manage your project efficiently and their powerful tool helps you to manage your project well. For any project Data management (import and export) is very essentials milestone for any environment and this can surely be a time consuming and lengthy if we are not using the right tools.
Well, LifeCycle service (LCS) provides a powerful tool to manage the data import and export for a project. Configuration and data manager tool (to import data package, will cover in next post) allows selecting multiple data packages and import in any environment for a project. In this article, I will show how to create default data package in LCS asset library. This tool will help you create the default template in a sequential manner.
(However, I planed a long back to write this article but…. Winking smile I hope its never too late. )
Let's start…..
1. Login into https://lcs.dynamics.com/ using your organization credentials.
2. Select the project and go to Asset library > Process data Package; if you didn't see this tool icon on project landing page then try below
image
You can see we have only 2 files here.

3. Now to create default packages click on Import button and select a library from the list,
image

4. The above step will create a new record in process data package, it will create the data packages under ‘Data package’ tab in Asset library.
image

5. Once this process done you can go back to configuration and data manage toll you can see all the packages available here. You can download them, you can import them into any other environment. Also, you can download and fill out the data and upload them back on LCS to deploy these package on another environment.
image

Thanks all for the subjected topic, the below few details to explore further,

You can also update the Data packages (add new records, remove associate business process etc, ). To explore this go back to Asset library and click on your record and follow below steps.
image


In the next screen (Add data packages) you will see the list of all packages with sequencing number.
image

Also if you click on each package in above list in right window you will the details for the selected package.
Click on next> Next and complete this wizard.  (for this post don’t select anything on 4th step ‘Associate business process to data package’)

Cheers
Harry

August 31, 2016

Recurring Data import/Export in AX7

Hi Folks,

Since we have AX7 in market now and many of us already started on this excited version. There are many new things coming in and some are deprecated as well. 

I was facing a requirement on DIXF in AX7 where I need to import a file from a shared path. As AX7 is on Azure now and every export/import will be using blob. So here issues come, how we can use our shared path to import/Export the files. However, I didn’t found any straight forward method for dequeue (export), but successfully done with enqueue(Import).

You can refer below link for more details and download API to support your customization. 


If you check the README file in DIXF sample, where they mention some compatibility issue with CTP8 version, so EXCEL will not have supported there, you may face version issue 

"The version of Microsoft Excel is not supported. -Exception from HRESULT: 0xC020801C"

There is one blog also which can help you somehow but again ODBC is not supported in AX7 because of Azure/cloud thing. 

So what I did here is, I used an XML file to import and it worked for me. It will pick XML file from your defined path and push file into your AX recurring job. All you need to do after getting all parameter for this API, insert your data into an XML file and use this, it should work.

Soon I will post a blog on this API, how to use this with more details on prerequisite.

You can post your question in comment, I would be happy to discuss.

Thanks to my friend Sharran sundar Balasubramaniam who helped me a lot on .net part.

-Harry Follow us on Facebook to keep in rhythm with us. @Facebook https://www.facebook.com/theaxapta

September 15, 2015

DIXF error [AX2012 CU8]


Issue: While Open Processing Group (Data import export framework/Area page/Common/Processing Group), system throws below error message.

Could not load file or assembly 'Microsoft.Dynamics.AX.Framework.Tools.DMF.PreviewGrid, Version=6.3.0.0, Culture=neutral, PublicKeyToken=31bf3856ad364e35' or one of its dependencies. The system cannot find the file specified.

image

Possible reason:

After a fresh installation of AX, we have DIXF as a module but we need to install additional component as well to use DIXF.
In this case we need to install DIXF client services from installation media.

Solution:


Install DIXF client services from AX setup and restart the AOS services.
image

Keep sharing your feedback as comment…..

Related post:
DIXF Error- Assembly containing type
-Harry

February 14, 2015

DIXF Error- Assembly containing type Microsoft.Dynamics.AX.Framework.Tools.DMF.ServiceProxy.DmfEntityProxy is not referenced.

Hi Folks,

While setup the DIXF parameter using click on DIXF-> Setup-> DIXF parameter. System throws below error

Error Message: Assembly containing type Microsoft.Dynamics.AX.Framework.Tools.DMF.ServiceProxy.DmfEntityProxy is not referenced.

Object 'CLRObject' could not be created

image


Possible reason: There can be multiple reason for this issue, here i am share which i faced. In AX 2012 R3, you will found module for DIXF even if didn’t install DIXF from setup.


image


Solution: Above mention error come because you are trying to set parameter without installing its component (Service, Server and Client). Just install those component from setup file and restart the AOS service. Now this error should not bother you this time. :)

There is one more link for same issue, may be this will also help you.


- Harry

May 22, 2013

How to Read/Write an Excel file through X++ code


How to write an Excel file through X++ code

In This Post you will found two code sample
1.Write data in excel through X++ code.
2. Read from an Excel through X++ code

1.Write data in excel through X++ code.


static void thaAxapta_Write2Excel(Args _args)
{

InventTable inventTable;
SysExcelApplication application;
SysExcelWorkbooks workbooks;
SysExcelWorkbook workbook;
SysExcelWorksheets worksheets;
SysExcelWorksheet worksheet;
SysExcelCells cells;
SysExcelCell cell;
int row;
;
application = SysExcelApplication::construct();
workbooks = application.workbooks();
workbook = workbooks.add();
worksheets = workbook.worksheets();
worksheet = worksheets.itemFromNum(1);
cells = worksheet.cells();
cells.range('A:A').numberFormat('@');
cell = cells.item(1,1);
cell.value("Item");
cell = cells.item(1,2);
cell.value("Name");
row = 1;
while select inventTable
{
    row++;
    cell = cells.item(row, 1);
    cell.value(inventTable.ItemId);
    cell = cells.item(row, 2);
    cell.value(inventTable.ItemName);
}
application.visible(true);
}


2. Read from an Excel through X++ code

static void theAxapta_ReadExcel(Args _args)
{

SysExcelApplication application;
SysExcelWorkbooks workbooks;
SysExcelWorkbook workbook;
SysExcelWorksheets worksheets;
SysExcelWorksheet worksheet;
SysExcelCells cells;
COMVariantType type;
int row;
ItemId itemid;
Name name;
FileName filename;
;
application = SysExcelApplication::construct();
workbooks = application.workbooks();
//specify the file path that you want to read
filename = "C:\\item.xls";
try
{
    workbooks.open(filename);
}
catch (Exception::Error)
{
    throw error("File cannot be opened.");
}
workbook = workbooks.item(1);
worksheets = workbook.worksheets();
worksheet = worksheets.itemFromNum(1);
cells = worksheet.cells();
do
{
    row++;
    itemId = cells.item(row, 1).value().bStr();
    name = cells.item(row, 2).value().bStr();
    info(strfmt('%1 - %2', itemId, name));
    type = cells.item(row+1, 1).value().variantType();
}
while (type != COMVariantType::VT_EMPTY);
application.quit();
}

March 14, 2013

Exporting data to Excel from axapta x++

Exporting data to Excel from axapta x++


Hi All!
Sometimes we need to export data from Microsoft Dynamics AX to Excel using axapta x++ code and we don't know how to do this...
Exists some differents ways to do this, but I think the best way is using the SysExcel class of Dynamics AX and its related.
The only problem I found using this class... is that it can not be used in a batch process.
Sample code:


static void TheaxaptaCreateExcel(Args _args)
{
   SysExcelApplication  xlsApplication;
   SysExcelWorkBooks    xlsWorkBookCollection;
   SysExcelWorkBook     xlsWorkBook;
   SysExcelWorkSheets   xlsWorkSheetCollection;
   SysExcelWorkSheet    xlsWorkSheet;
   SysExcelRange        xlsRange;
   CustTable            custTable;
   int                  row = 1;
   str                  fileName;
   ;
   //Filename
   fileName = "C:\\Test.xlsx";
   //Initialize Excel instance
   xlsApplication           = SysExcelApplication::construct();
   //Open Excel document
   //xlsApplication.visible(true);
   //Create Excel WorkBook and WorkSheet
   xlsWorkBookCollection    = xlsApplication.workbooks();
   xlsWorkBook              = xlsWorkBookCollection.add();
   xlsWorkSheetCollection   = xlsWorkBook.worksheets();
   xlsWorkSheet             = xlsWorkSheetCollection.itemFromNum(1);
   //Excel columns captions
   xlsWorkSheet.cells().item(row,1).value("Account Num");
   xlsWorkSheet.cells().item(row,2).value("Name");
   row++;
   //Fill Excel with CustTable AccountNum and Name fields (only 20 records)
   while select custTable
   {
      if(row == 20)
        break;
      xlsWorkSheet.cells().item(row,1).value(custTable.AccountNum);
      xlsWorkSheet.cells().item(row,2).value(custTable.Name);
      row++;
   }
   //Check whether the document already exists
   if(WinApi::fileExists(fileName))
      WinApi::deleteFile(fileName);
   //Save Excel document
   xlsWorkbook.saveAs(fileName);
   //Open Excel document
   xlsApplication.visible(true);
   //Close Excel
   //xlsApplication.quit();
   //xlsApplication.finalize();
}

-Harry