Search This Blog
April 09, 2025
How to trigger Business event using x++ code
January 24, 2025
Custom web service in D365FO - Part-I
Introduction
Custom services in Dynamics 365 Finance and Operations (D365FO) allow you to expose custom business logic and data to external systems. This first part of the blog post will walk you through the basics of creating and consuming custom services in D365FO. Custom services are used to expose X++ business logic to external systems via SOAP or RESTful endpoints. They are ideal for scenarios where you need to implement complex business processes that are not covered by standard services.
In later posts, we will discuss some complex scenarios and best practices around web services.
Architecture
Service Request Contract
The service contract defines the operations that the service will expose. This is done by creating a new class with the [DataContractAttribute] and [DataMemberAttribute] attributes. There must be two contract classes: one for the request message and another for the response message. (We will cover this in detail in future posts).
Example:
[DataContractAttribute]
public class TheAxaptaRequestContract
{
    private boolean isShipped;
    private String255 dataAreaId;
    private String255 storeNumber;
    private String255 trackingNumber1;

    [DataMember("TrackingNumber1")]
    public String255 parmTrackingNumber1(String255 _trackingNumber1 = trackingNumber1)
    {
        trackingNumber1 = _trackingNumber1;
        return trackingNumber1;
    }

    [DataMember("IsShipped")]
    public boolean parmIsShipped(boolean _isShipped = isShipped)
    {
        isShipped = _isShipped;
        return isShipped;
    }

    [DataMember("DataareaId")]
    public String255 parmdataAreaId(String255 _dataAreaId = dataAreaId)
    {
        dataAreaId = _dataAreaId;
        return dataAreaId;
    }

    [DataMember("StoreId")]
    public String255 parmStoreNumber(String255 _storeNumber = storeNumber)
    {
        storeNumber = _storeNumber;
        return storeNumber;
    }
}
Service Response Contract
Example:
[DataContractAttribute]
public class TheAxaptaResponseContract
{
    private boolean success;
    private str errorMessage;
    private str debugMessage;
    private System.String salesOrder;

    [DataMember("Message")]
    public str parmMessage(str _value = errorMessage)
    {
        if (!prmIsDefault(_value))
        {
            errorMessage = _value;
        }

        return errorMessage;
    }

    [DataMember("Success")]
    public Boolean parmSuccess(Boolean _value = success)
    {
        if (!prmIsDefault(_value))
        {
            success = _value;
        }

        return success;
    }

    [DataMember("DebugMessage")]
    public str parmDebugMessage(str _value = debugMessage)
    {
        if (!prmIsDefault(_value))
        {
            debugMessage = _value;
        }

        return debugMessage;
    }
}
Service Class
This is the class where the actual business operation executes. It takes the request message from the respective contract class and processes it to create a response message. Create a new class to implement the service. This class should extend the SysOperationServiceBase class and include the business logic for the service operations.
Example:
public class TheAxaptaService extends SysOperationServiceBase
{
    TheAxaptaResponseContract response = new TheAxaptaResponseContract ();

    [AifCollectionType('salesOrder', Types::Class, classStr(TheAxaptaRequestContract)),
    AifCollectionType('return', Types::Class, classStr(TheAxaptaResponseContract ))]

    public processMsg()
    {
        TheAxaptaRequestContract request;
        // Now you can access the parm methods of the request class to get different values from the request
        Str StoreId = request.paramStoreNumber();

        response.parmSuccess(True);
        response.parmMessage("Message read");
    }
}
Register the Service
Register the service in the AOT (Application Object Tree) by creating a new service node. Set the class and method properties to point to your service implementation.
- In the AOT, right-click Services and select New Service. (e.g. TheAxaptaInterface)
- Set the Class property to your service class (e.g., TheAxaptaService).
- Set the Method property to the service method (e.g., processMsg).
Deploy the Service
Deploy the service to make it available for consumption. This can be done by right-clicking the service node in the AOT and selecting Deploy Service Group.
Consume the Service
April 30, 2023
Azure Key vault parameter setup in D365FO
February 25, 2023
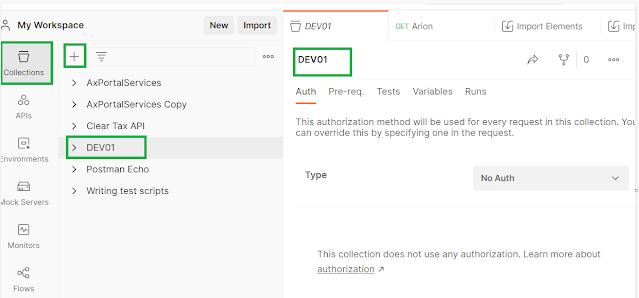
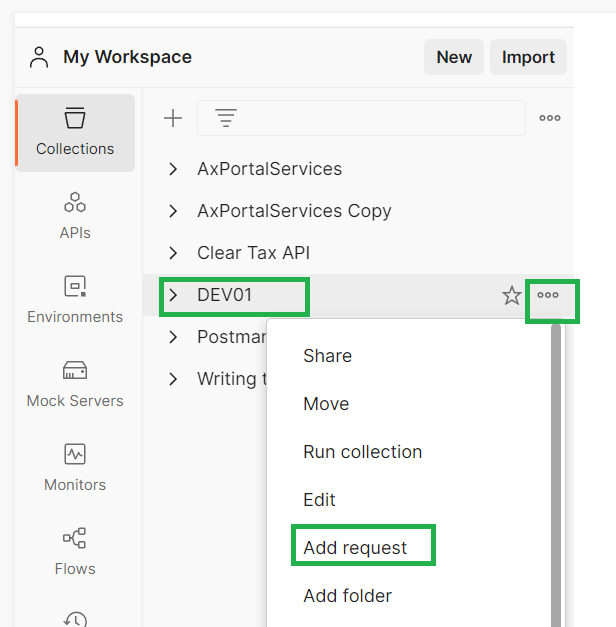
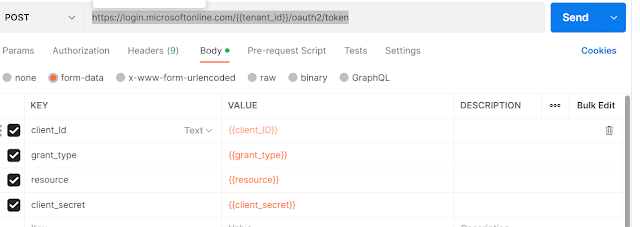
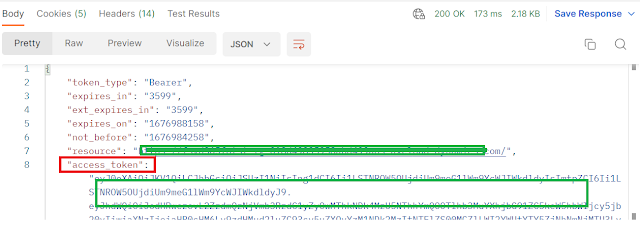
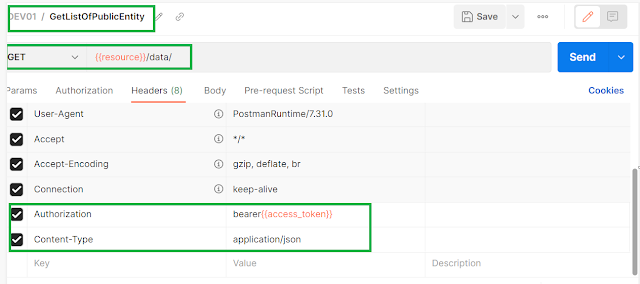
Best way to do Postman setup with D365FO
7. Name this request as 'Authorization', you can name it as per your use like getting public entities details or get a specific entity data or metadata. In the post request paste below as is.
Now you see we parameterize most of things and you don't need to create multiple request for different environments, you can simple change the environment from right top corner.
December 26, 2022
More about Bicep
November 11, 2022
Useful links for OData and Rest API integration
July 30, 2020
Say Hello to Microsoft DataFlex
Hi Folks,
Here we go again with a rebranding around CDS which is now known as DataFlex, yes that's right, CDS is now DataFlex - a new low-code data platform for Microsoft Teams. You can create and run thousands of applications, flows, and intelligent agents with a smart, secure, and now with scalable low-code data platform.
What it offers:
DataFlex Pro: Its more or less the same as what we have in CDS today including same licensing i.e.
$10/app/User/Month
$40/User/Month – unlimited apps
DataFlex: Its basically a new simplified version or I would say lightweight of CDS for building an app on top of Microsoft Team. It includes as free with your Microsoft office 365 license which includes Teams.
Below is a screenshot for reference, hoe easily you can create different tables and columns to meet business requirements.
Why DataFlex?
i. Provides the ability to use model-driven power apps in Teams with no extra licensing cost.
ii. Currently, to build an app for Team you need to use the SharePoint list to save some licensing cost that too not a relation Database and without scalability. While DataFlex provides a free relation DB to build a team-based PowerApps
iii. A low code tool that enables you to build Team apps and bots similar to native apps.
iv. Streamline identity protection and secure guest access with identity management and multifactor authentication.
v. Reduce data management stress and let Dataflex Pro determine your storage needs for relational data, file and blob storage, logs, and search indexing.
vi. Quickly develop applications your way—either with custom code or using no or low-code—across Azure, Office 365, and Dynamics 365, and with more than 300 connectors.
vii. Create a solid data foundation using automatic duplication detection and more than 300 data transformations that clean and reshape data
Further references:
> Introducing Project Oakdale, a new low-code data platform for Microsoft Teams
> CDS Doc
September 02, 2019
Set up MT940 format for bank reconciliation #MSD365FO
In D365FO advance bank reconciliation is a feature to import bank statement file and automatically reconcile with related bank accounts. There are many formats which a bank commonly used i.e. ISO20022, MT940, BAI2.
In this post, we will see how to set up the MT940 format which is commonly used in most banks nowadays.
Let's get started.
Step 1: Get sample entity template and transformation files
To transform the source file into FnO format, you need few files and these are available under 'Resources' node of AOT. Files names are as below
Step 2: Create an import project
Under Data management workspace, create an import project with name MT940. Add a new file with below details
I. Entity Name: Bank statements
II. Upload file name: SampleBankCompositeEntity (which you got from Resource node)
Once file successfully uploaded, click on view map. On next screen select BankStatementDocumentEntity from the list and click on 'View Map' and go to 'Transformation' tab. Click new and click upload file, select different XLST file one by one, in the sequence shown in below image.
Step 3: Setup Bank statement format
Navigate to Cash and Bank management > Setup > Advance bank reconciliation setup > Bank statement format.
Here create a new record as below
Step 4: Configure the bank account to use Advance reconciliation option
Navigate to Cash and Bank management > Bank accounts. Select a Bank account to view details. Under Reconciliation tab,
I. Set the 'Advance bank reconciliation' option to 'yes'. This is a one-time setup, the system doesn't allow to undo/change once set to yes.
II. Set Statement format field to format which we have created in step 3 i.e. MT940
Step 5: Testing
Navigate to Cash and Bank management > Bank accounts. On Reconcile tab click on Bank statements.
On the next screen click on Import statement. A dialog will pop up. Fill/select details as below
I. Import statement for multiple bank account in all entities. : Set this as Yes if your file contains more than one bank accounts.
II. Bank Account: If the source file contains a single bank, select that bank here.
III. Statement Format: Select your statement format here it must be MT940.
IV: Bank statement file import: Select source file and click upload.
V: Click ok and it must import transaction in the current form.
Note: After every DB refresh you need to redo import project. DB will break the links and you need to remove the entity from your import project and add upload the transformation files accordingly.
-Harry Follow us on Facebook to keep in rhythm with us. https:fb.com/theaxapta
PS: This post referred to MS documentation.
May 13, 2019
How to add 'Actions' on Odata entities
[Updated on Jan 27, 2020
I got one feedback about Odata action on entity extension are not supported. It worked for me for one odd case, I yet to test myself if its not working now. I would request all readers to take necessary caution while trying below code. Thanks to Ashish for sharing his feedback.]
public static void <methodName>(<parameters(optional)>)
{
}
October 02, 2013
Connecting to Databases through X++ PART -IV
Connecting to Databases through X++ PART -IV
{
}
static void dbConnectionClass()
{
ResultSet rs;
SqlStatementExecutePermission perm;
;
perm.assert();
{
info(rs.getString(1));
}
CodeAccessPermission::revertAssert();
}
private static ResultSet statementExeQuery(str _sql, Connection _con = null)
{
ResultSet resultSet;
Statement statement;
;
{
if(!_con)
{
_con = new Connection();
}
// BP deviation documented
resultSet = statement.executeQuery(_sql);
}
catch (Exception::Error)
{
throw error("@SYS99562");
}
}
{
;
}
Related posts,
-Harry
September 16, 2013
Connecting to Databases through X++ PART -III
Connecting to Databases through X++ PART -III
OLEDB Connection:
{
System.Exception e;
System.Data.OleDb.OleDbConnection objConn;
System.Data.OleDb.OleDbCommand cmdSelect;
System.Data.OleDb.OleDbDataReader reader;
InteropPermission perm;
str connectStr = "Provider=SQLNCLI.1;Integrated Security=SSPI;"+
"Persist Security Info=False;Initial Catalog=AX2009;Data Source= theAxapta ";
str exceptionStr;
;
{
perm = new InteropPermission(InteropKind::ClrInterop);
if (perm == null)
{
throw error("Error with file permissions");
}
perm.assert();
objConn.Open();
cmdSelect.set_CommandText("SELECT * FROM CustTable where DATAAREAID = ‘CEU’");
reader = cmdSelect.ExecuteReader();
{
info(reader.GetString(0));
}
}
catch(Exception::CLRError)
{
CodeAccessPermission::revertAssert();
if (perm == null)
{
return;
}
perm.assert();
{
exceptionStr += e.get_Message();
e = e.get_InnerException();
}
info(exceptionStr);
}
catch
{
error("An Exception has occurred");
}
objConn.Close();
}
Other related posts:
September 11, 2013
Connecting to Databases through X++ PART -II
Connecting to Databases through X++ PART -II
Class Name | Description |
Helps in establishing a connection to the target database. | |
Helps in executing a command (a Text type or a Stored procedure) | |
Stores the data | |
A collection of all fields in CCADORecordSet | |
A single field from the collection of fields | |
A class that helps in passing parameters that a command needs or demands |
{
CCADOConnection connection = new CCADOConnection();
CCADOCommand ccADOCommand;
CCADORecordSet record;
str connectStr = "Provider=SQLNCLI.1;Integrated Security=SSPI;"+
"Persist Security Info=False;Initial Catalog=AXDEVDB;Data Source= theAxapta";
;
try
{
connection.open(connectStr);
ccADOCommand = new CCADOCommand();
ccADOCommand.commandText("Select * from CustTable where DataAreaId = ‘CEU’");
ccADOCommand.activeConnection(connection);
record = ccADOCommand.execute();
recordSet = record.recordSet();
while (!record.EOF())
{
info(any2str(record.fields().itemIdx(0).value()));
recordSet.moveNext();
}
}
catch
{
error("An Exception has occurred");
}
}
-Harry
September 09, 2013
Connecting to Databases through X++ PART -I
{
LoginProperty loginProp;
ODBCConnection conn;
Resultset resultSet, resultSetCount;
Statement statement1, statement2;
;
loginProp.setDatabase(‘AXDEVDB′);
resultSet = statement1.executeQuery("SELECT * from CustTable where DATAAREAID = ‘CEU’");
{
info(resultSet.getString(1));
}
}
Other related posts:
-Harry


