Showing posts with label ax 2009. Show all posts

August 03, 2013

Create Progress bars in Dynamics AX

 Create Progress bars in Dynamics AX [startlengthyoperation, SysOperationProgress,Animations ]

Progress bars are inbuilt in runbase frameworks. We can Use a progress indicator during operations that take more than 2 seconds 
OR
Use an hourglass mouse pointer if the process takes 2-7 seconds.
OR

Use a progress bar if the process takes 8 seconds or more.

There are many ways to display operations in progress
1) Hourglass Indicators
2) Progress Bars
3) Progress controls on the forms
4) Animate Controls


Hour Glass Indicators Example:

Use startlengthyoperation() and endlengthyoperation() between ur business logic
Example :


static void HourGlassMousePointer(Args _args)
{
int i;
str value;
;

startLengthyOperation();
for( i = 1; i <= 10000; i++)
{
value += int2str(i) + ','; // some business logic
}


endLengthyOperation();
}

Below is how the hourglass indicator looks


Use SysOperationProgress class to show the progress Bars
Initialize a SysOperationProgress variable.
Set a caption for the form by using the SysOperationProgress.setCaption method.
Set an animation to run while the operation is in progress by using the SysOperationProgress.setAnimation method.
A number of animations are provided with Microsoft Dynamics AX. To view them, run the Tutorial_ShowAVIFiles class. If you use one of these animation files, you need to declare the AviFiles macro at the top of your code.
Specify the total number of operation steps.
This is needed for the time-remaining calculation. If you do not set the total number of operation steps, the progress indicator is not shown. The total is often a count of the number of records, and may be time-consuming to calculate. Don't specify the total if the time is taken to calculate the records is comparable to the total time taken for the operation.

Perform the operation. For each step, specify a description and a step number.
During the execution, the progress indicator is updated accordingly. The estimated time remaining is calculated and displayed.
The default update interval is 3 seconds. If the task of updating the display takes more than 10% of the update interval due to latency on the network connection, the update interval is increased by 1 second.

Example :


static void operationProgress_progressBars(Args _args)
{
#AviFiles
SysOperationProgress progress = new SysOperationProgress();
int i;

;

progress.setCaption("Progress bar example…");
progress.setAnimation(#AviUpdate);
progress.setTotal(10000);
for (i = 1; i <= 10000; i++)
{
progress.setText(strfmt("The value of i is %1", i));
progress.setCount(i, 1);
}
}

Below is the output:
Use progress control on the form:
Create a new progress control and change the autodeclaration property of the progress control to yes as shown in the figure.

In the init() or run() method of the form modify the code as shown below.


SysDictClass dictClass;
int i;
int classCount;
classId classId;
Dictionary dictionary;
;
super();
dictionary = new Dictionary();
classCount = dictionary.classCnt();

progress.rangeLo(1);
progress.rangeHi(classCount);
progress.pos(1);
progress.step(1);


for (i=1; i <= classCount; i++)
{
progress.pos(i);
dictClass = new SysDictClass(dictionary.classCnt2Id(i));
info(dictClass.name());
}


Finally Animations: we can use Animations to let the end users know that process is running at the back ground.
We can use Animate controls to show the progress. Create a new form and add a animate control as shown below. Change the autoDeclaration property of the animate control to Yes


Override the run() method and paste the below code
public void run()
{
int i;
#AviFiles
;
super();
for (i = 1 ; i <= 10000; i ++)
{
Animate.animateFile(#AviPrint);
Animate.play(); // autoplay(true);
}


Animate.visible(false);
}

Below is the output


-Harry

March 20, 2013

Upload an image in a form window control

Upload an image in a form of window control

Hi Guys,
Here is the code for Upload an image in a form of window control in your Axapta world.
Go n Get It......

str filename;
FileNameFilter filter = ['JPG files','*.jpg'];
Bindata binData;
Image signatureImage = new Image();

super();

filename = Winapi::getOpenFileName(element.hWnd(), filter, '', "Upload your image", '', '');

binData = new BinData();

if (binData.loadFile(filename))
{
signatureImage = binData.getData();
FormWindowCOntrol.image(signatureImage);
FormWindowCOntrol.widthValue(signatureImage.width());
FormWindowCOntrol.heightValue(signatureImage.height());
element.resetSize();
element.unLock();
}

-Harry

March 06, 2013

Integrating Axapta with Microsoft Outlook

Integrating Axapta with Microsoft Outlook

In Microsoft Dynamics AX 4.0, you can set up the Microsoft Office Outlook Integration to integrate contacts, tasks and appointments between Microsoft Dynamics AX and Microsoft Office Outlook.
To set up the Microsoft Office Outlook Integration to integrate contacts, tasks and appointments between Microsoft Dynamics AX and Microsoft Office Outlook, follow these steps:

1. View the e-mail account setting in Control Panel, follow these steps:

a. Click Start, click Control Panel, and then click Mail.
b. In the Mail Setup – Outlook dialog box, click E-mail Accounts.
Note If the profile is not set for the desired user, click Show profiles, change to use the correct profile, click Properties, and then click E-mail Accounts.
c. Click to select the View or change existing e-mail accounts option, and then click Next.
d. Click Change.
e. In the E-mail Accounts dialog box, note the user name in the User Name field, and then note the value in the E-mail Address field.
2. Verify that all information on the Microsoft Office Outlook tab is correct in the Employee dialog box. To do this, follow these steps:

a. Click Administration, and then click Users.
b. In the User dialog box, click a user, and then click User relations.
c. On the General tab, select the employee record that you try to integrate with the current user in Microsoft Dynamics AX in the Employee field.
d. Click Human Resources, click Employee, and then click the record that you selected in step 2c.
e. In the Employee dialog box, click the Contact information tab, and then specify the correct e-mail account information in the E-mail field. This information should match the value in the E-mail Address field in step 1e.
f. Click the Microsoft Office Outlook tab, and then view the information. You may notice that not all information is specified.
Note In this step, you must verify that the "Microsoft Office Outlook user Identification" setting matches the user name in the User Name field in step 1e. This will make sure that you can synchronize Microsoft Dynamics AX and the Outlook client on the computer.
3. Run the Use current Microsoft Office Outlook profile function to set the program to use the current Outlook profile. To do this, click Function, and then click Use current Microsoft Office Outlook profile.
4. Follow these steps to synchronize contacts, tasks and appointments between Microsoft Dynamics AX and Outlook:
a. Run the Pick contact Microsoft Office Outlook folder function.
b. Run the Pick task Microsoft Office Outlook folder function.
c. Run the Pick appointment Outlook folder function.

image
5. Click Save.
if you want to save send copy in your outlook then check the box

-Harry

February 18, 2013

List view Control in Dynamics AX

Hi Friends,

Here is step by step Tutorial for ListView FormControl.  During this tutorial we create a separate Form (just for testing this tutorial).

ListView Control helps you when you want to select multiple records from a list of records see below image

image

Follow this steps

Step 1: Create a new Form and name it “_ListView”
In design Node, Add a new Control called ListView and name it as “LeftListView” as shown below.


By default -AutoDeclaration property of the ListView will be “Yes”.(Because you have to access this in your code for insert/Access/Delete items from ListView)
Now lets learn some important properties of the listView. Change the View type property from “Icon” to “Report” s shown below.


Save the form and now let’s add coulmns to the list view. Since we have set the autodeclaration property of the LeftListView to “yes”, we can use this control inside the code.

Step 2: Override the init() method of the Example_ListView form and add the below lines of code to add columns to the list View as shown below
LeftListView.addColumn(1,new FormListColumn(‘List of customes’,1, 200));
Refer to the image below for the same.


Step 3: Now let us insert items to the list.
Override the run() method of the form and insert the below lines of code. We are actually fetching all the customer names from the standard CustTable and adding the same to the list.


public void run()
{
CustTable custTable;
;
super();


// Adding items to the list
while select Name from custTable
{
LeftListView.add(custTable.Name);
}

}
Below image is the same for the reference


Now let’s see how the items looks like in our list.
Open the Example_ListView form by using shortcut key “Ctrl + O “
Below image is for your reference.


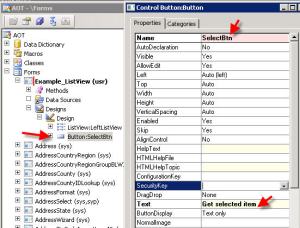
Step 4: Add a new button to the form by Right clicking the design >> Chose Button control. Name the button as SelectBtn and Text property set to “Get selected item” as shown below


Override the clicked() method of the nelwy created button and add the below lines of code. This code will help you to show the selected item by the user in the list upon clicking on the button in the infolog

void clicked()
{
FormListItem item;
int i;
;


super();
i = LeftListView.getNextItem(FormListNext::Selected);
while (i != -1)
{
item = LeftListView.getItem(i);
info (item.text());
i = LeftListView.getNextItem(FormListNext::Selected,i);
}
}


Below is the image for the reference


Note: By default the Listview will not allow the multiple selection of items on the list. To allow users multiple selection, go to the LeftListView control properties and change the property of MultipleSelection from “No” to “Yes” as shown below


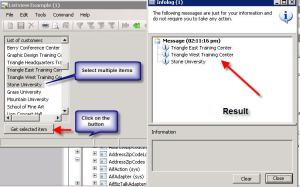
Step 5: Select multiple items in the list[By using shift key] and click on the button to view the selected items by the user in the infolog. Below is the result.


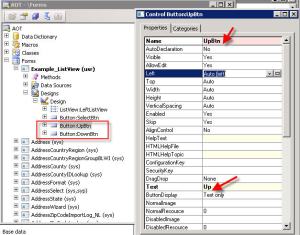
Step 6: Move up and down the items [Arrange] in the list View. To do this add 2 new buttons to the Form. Name them as UpBtn and DownBtn . Provide the text property on the buttons as “Up” and “Down”


On the upBtn >> Overide the Clicked method and paste the below lines of code to move the item up [Select the item in the listview and use Up arrow to move the item upwards]

void clicked()
{
int i = LeftListView.getNextItem(FormListNext::Selected);


LeftListView.moveItem(i, i-1);
}


Similarly on the DownBtn >> Override the clicked method and paste the below code

void clicked()
{
int i = LeftListView.getNextItem(FormListNext::Selected);


LeftListView.moveItem(i, i+1);
}


Moveitem is the method which will help to move or arrange the items in the list through index. If we decrement the index, the item will be moved up and on incrementing the item will move down.
Step 6: Finally, how to move items from one list to another. To do this let’s create one more list in the form by right clicking the desgins and add new ListViewControl . Name the newly created ListView control to “BottomListView” and change the ViewType property of the listView to Report. [Refer to Step 1]
Below is the screen shot for your reference.


Step 7: Now we need to add columns to this newly created list which we did in the Step 2.

Modify the init() method of the form to add the columns to the 
BottonListView
BottomListView.addColumn(1,new FormListColumn(‘Moved customers’,1, 200));

Step 8: Lets add one more button which should help to move item from the LeftListView to ButtonListView.
Create a new button and name it as “MoveBtn” and give the text property as “Move Items” as shown below.


Step 9: Override the clicked() method of the MoveBtn and add the below lines of code to move the items from one list to another.
Business logic : Get the selected item from the LeftlistView. Add to the another list i.e BottomListView. Delete the item/items from the LeftListView.

void clicked()
{
FormListItem item;
int i;
;


super();
i = LeftListView.getNextItem(FormListNext::Selected);
while (i != -1)
{
item = LeftListView.getItem(i);

BottomListView.addItem(item); //Add items to the BottomListView
LeftListView.delete(i); // Delete the selected item from the LeftListView


i = LeftListView.getNextItem(FormListNext::Selected,i);
}
}


-Harry

October 20, 2012

Document Handling in Microsoft Dynamics AX

Document Handling in Microsoft Dynamics AX 2009 and 2012


Document Handling is very useful to attach files related to AX data to forms. It’s possible to add data at any form. It is also useful to attache any reference document to any record in Form.
To use Document Handling you have to activate it by follow these steps...

To activate this feature follow the next steps:


1. Go to BasicSetupDocument management:


image
image
2. Setup Parameters:

image

Active directory is the default path where allocate the files to attach.
Check Use Active document tables has to be activated.


image

Number sequence to numerate the attachments.
3. Define Document types:

image

For each type it’s necessary define the location folder:

image

4. Select in which forms it’s possible to attach documents in Active document tables:

image


5. Now, we can attach documents in the above forms. For example in Employees form:

image
image


For this example, we are going to attach a Photo:
image

Select the photo and click open:

image


With the check Show file activated we can see the photo/document:

image

Also, we can open the document with the right button Open.

-Harry

September 22, 2012

AX 2012 – Data Migration Framework


AX 2012 – Data Migration Framework: Step-by-step setup

Recently i found a great blog on Data Migration Framework,
follow this link

AX 2012 – Data Migration Framework: Step-by-step setup

Its really help full for the step by step process of Data migration in AX 2009 to Ax 2012.

- Hary

September 10, 2012

How to send E-Mail In Microsoft Dynamics AX

How to send E-mail In  AX

There are more than one way to send emails through Microsoft Dynamics AX system, using X++ code.
The most recommended way is to use the standard mail mechanism built in the system.
That way copies of any email you send will be save in the Email sending status form (based on tableSysOutgoingEmailTable) and you will be able to monitor and see status of sent emails:

http://theaxapta.blogspot.in/

(Administration -> Periodic -> E-mail processing -> Email sending status; Form: SysOutgoingEmailTable)


This mechanism based on a system table that contain the emails, and a batch job that scan that table and send the emails, one by one (with retries and status controlling).
This technique is very simple to use and therefore it has some disadvantages; you cannot add attachments or use advanced email properties (cc, bcc, priority flag, etc).
To use this mechanism, first you have to make sure you a SMTP server configured and running.
Go to
  Administration -> Setup -> E-mail parameters 
and fill the required settings:


(Form: SysEmailParameters)

Next step is to make sure the E-mail distributor batch is up and running.
Go to
  Basic -> Inquiries -> Batch Job and check if the batch job exists with status Executing orWaiting.


(Form: BatchJob)
If it doesn’t, you can activate it from Administration -> Periodic -> E-mail processing -> Batch.
Now we are ready to implement our X++ code:
void SendMail()
{
    SysMailer mail;
    SysOutgoingEmailTable outgoingEmailTable;
    SysEmailItemId nextEmailItemId;
    Map map;
    str SenderName, SenderEmail, To, Subject, Body;
;

SenderName = "X++.info";
SenderEmail = "Sender@xplusplus.info";
To = "recipient@xplusplus.info";
Subject = "Subject line for the email";
Body = "<B>Body of the email</B>";

nextEmailItemId = EventInbox::nextEventId();
outgoingEmailTable.EmailItemId = nextEmailItemId;
outgoingEmailTable.IsSystemEmail = NoYes::No;
outgoingEmailTable.Sender = SenderEmail;
outgoingEmailTable.SenderName = SenderName;
outgoingEmailTable.Recipient = To;
outgoingEmailTable.Subject = SysEmailMessage::stringExpand(Subject, map);
outgoingEmailTable.Priority = eMailPriority::Normal ;
outgoingEmailTable.WithRetries = false;
outgoingEmailTable.RetryNum = 0;
outgoingEmailTable.UserId = curUserId();
outgoingEmailTable.Status = SysEmailStatus::Unsent;
outgoingEmailTable.Message = Body;
outgoingEmailTable.LatestStatusChangeDateTime = DateTimeUtil::getSystemDateTime();
outgoingEmailTable.insert();
}

The result of the example above will shown in the Email sending status form as mentioned above.


(Administration -> Periodic -> E-mail processing -> Email sending status; Form: SysOutgoingEmailTable)

- I Hope it will  usefull for all of you...
-Harry


May 29, 2012

How to convert a Amount in Words


Hi Folks,

This code will work for the report as well as Forms also.  Of course this a lengthy code but you can write this in a class also for reuse this code.


-Harry

April 21, 2012

RunBase frameWork In X++

RunBase framework

Whenever you write a class that typically asks a user for input and then starts a process based on that input you use the RunBase framework as most of the typical methods needed for such a Job is already implemented in the RunBase class. This means that using the RunBase framework is done by extending RunBase either by directly extending RunBase or by extending a class that extends RunBase.
Some of the features implemented in the RunBase framework are the following:

• Run: The main flow of the operation
• Dialog: Prompting the user for input and storing that input
• Batch execution: Schedule the Job for later execution
• Query: Used to select data
• Progress bar: Shows the progress of a task
• Pack/unpack with versioning: Remember variable values until the next time
the task is executed


-Harry

April 16, 2012

Mehods in AX


Hi guys,

Here i  want to share a link for all basic methods which we can use i n our Form s and reports Customization....
here u find all predefined methods for axapta 2009 as well as 2012
Click here For Methods in AX

-Harry