July 03, 2023

A complete Guide - Configuring Power BI in Dynamics 365 Finance and Operations (D365FO)

Introduction:

Power BI is a powerful business intelligence tool that enables users to visualize and analyze data from various sources. When integrated with Dynamics 365 Finance and Operations (D365FO), Power BI can provide insightful reports and dashboards, empowering organizations to make data-driven decisions. In this blog post, we will walk you through the process of configuring Power BI in D365FO, allowing you to harness the full potential of these two Microsoft tools.

There are many default Power BI report available, and you can also develop and integrate your own reports. Let's follow the below steps to configure this in a Tier 2 environment as Microsoft doesn’t support Tier 1 environments for Power BI anymore.

Step 1: Accessing the Power BI service:

To begin the configuration process, you need to have access to the Power BI service. Visit the Power BI website (https://powerbi.microsoft.com/) and sign in using your Microsoft account credentials. Make sure you use the same account for all the below steps as well.

Step 2: Register the Power BI application:

In the Power BI configuration form, click on the "Register new app" button. This step will prompt you to sign in with your Power BI account credentials and authorize D365FO to access your Power BI resources. Check this post for step by step guide for app registration.

Once the app is registered you need to enable below API permission, 

I. Content :

Content. Create

II. Dashboard

Dashboard.Read.All

III. Dataset

Dataset.Read.All

Dataset.ReadWrite.All

IV. Report

Report.Read.All

V. Workspace

Workspace.Read.All

Step 3: Grant Permissions in Power BI Service:

Switch back to the Power BI service and navigate to "My workspace" or the desired workspace where you want to embed D365FO reports. Click on "Settings" and then "Admin portal." In the admin portal, select "Workspace settings" and choose the workspace where D365FO reports will be embedded. Under "Members," add the D365FO user account or security group that requires access to the Power BI reports.

Step 4: Setup Power BI Integration in D365FO:

In the D365FO environment, navigate to System Administration > Setup > Power BI configuration. Enable the Power BI integration by checking the "Enable Power BI Integration" checkbox.

Add application id and client secrete id which you got from App registration. Do the authentication on Power BI.

Step 5: Deploy Power BI Reports in D365FO:

Navigate to System Administration > Setup > Deploy Power BI files. Select your required report and on the top action pane, select ‘Deploy Power BI file’. You may get an error like below

‘Deployment failed for <Report Name>’, this is because you didn’t log in to PowerBI.com yet. Please follow step 1 and validate if you are able to see  ‘My workspace’ at the bottom left of the screen.

Step 7: Embed Power BI Reports in D365FO:

In D365FO, open the desired workspace where you want to embed the Power BI report. Click on "Options" and select "Personalize this form." Edit the form and add a Power BI tile to the desired location. Provide the "Report URL" or "Dashboard URL" for the Power BI report you want to embed. Additionally, you can specify filters and parameters based on your requirements.

You may get an error on the workspace similar to below
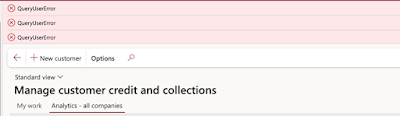
QueryUserError

To fix this issue you need to make sure the respective entity store is refreshed successfully. If you are facing an issue with the refresh, check out this post. 


Step 8: Save and Publish the Changes:

Save and publish the changes made to the form in D365FO. The Power BI report tile will now be visible to users in the designated workspace, allowing them to access and interact with the embedded reports.

Conclusion:

Configuring Power BI in Dynamics 365 Finance and Operations opens up a world of data analysis and visualization possibilities. By following these step-by-step instructions, you can seamlessly integrate Power BI with D365FO, enabling your organization to leverage insightful reports and dashboards to make informed decisions. Remember to ensure appropriate permissions and access control settings to maintain data security and governance. With Power BI and D365FO working together, you can unlock valuable insights and drive business success.


-Harry Follow us on Facebook to keep in rhythm with us. https:fb.com/theaxapta

June 17, 2023

Step-by-Step Guide to Azure App Registration Process

Introduction:

Azure App Registration is a crucial step when developing applications that integrate with Azure services. It allows your application to authenticate and access resources securely within the Azure ecosystem. In this blog post, I will provide a comprehensive, step-by-step guide to the Azure App Registration process, helping you understand the necessary steps to register your application.

App registration is required for a lot of purposes in D365FO, for example

1.    To set up Warehouse mobile

2.    Setup out of box Power BI report

3.    Postman configuration

4.    Various integration scenarios


Prerequisite: Just one, get the admin account and use the same account for all the steps, this account should have access to D365FO as well.  (I know it's not mandatory but I would recommend this.)

Step 1: Access the Azure Portal:

To begin the Azure App Registration process, log in to the Azure Portal (https://portal.azure.com) using your Azure account credentials. Once logged in, you'll have access to the Azure dashboard.

Step 2: Navigate to Azure Active Directory:

From the Azure dashboard, locate and select "Azure Active Directory" from the list of available services. Azure Active Directory is a comprehensive identity and access management solution provided by Microsoft. (To make sure you choose the right directory).

Step 3: Choose "App Registrations":

Within Azure Active Directory, navigate to the "App registrations" section. This section allows you to manage all your application registrations. You can search for the same in the top search bar.

Step 4: Click "New Registration":

Click on the "New Registration" button to initiate the app registration process. You will be prompted to provide essential details about your application.


Step 5: Fill in Application Details:

In this step, you need to provide the following details:

- "Name": Enter a unique name for your application.

- "Supported account types": Choose the appropriate account type (such as "Accounts in this organizational directory only" or "Accounts in any organizational directory"). Mostly it will be within the same organization.

- "Redirect URI": Specify the URI where Azure will redirect users after authentication. This is typically the URI of your application. In our case, it will be the URL of D365FO environment.

Step 6: Register the Application:

After providing the necessary details, click on the "Register" button to create the application in Azure. Azure will generate a unique "Application (client) ID" that you will need to use during the development and configuration of your application.


Step 7: Configure API Permissions:

To access Azure resources from your application, you need to grant it appropriate permissions. In the app registration page, navigate to "API permissions" and click on "Add permission." Here, you can select the APIs and permissions required for your application. This section is used if you are going to use this for Power BI.


Step 8: Grant Admin Consent:

Once you have configured the necessary API permissions, you need to obtain consent from an Azure administrator. Click on the "Grant admin consent for <your organization name>" button to initiate the consent process.


Step 9: Generate Client Secrets:

If your application requires a client secret, such as when using the OAuth 2.0 client credentials flow, navigate to the "Certificates & secrets" section within the app registration page. Here, you can create and manage client secrets securely. Copy the value securely as it will not visible after this step and you need this for most of the applications eg. the Warehouse mobile app, and Power BI configuration.


Step 10: Application Configuration (Optional):

After completing the app registration process, you can configure additional settings specific to your application, such as branding, authentication options, and more. Explore the app registration page and adjust the settings as per your requirements.


Conclusion:

The Azure App Registration process is a vital step when building applications that integrate with Azure services. By following this step-by-step guide, you can successfully register your application in Azure Active Directory, configure necessary permissions, and obtain the required credentials for secure authentication and access to Azure resources. Properly registered applications can take advantage of various Azure services and APIs while ensuring a streamlined and secure development process.


-Harry Follow us on Facebook to keep in rhythm with us. https:fb.com/theaxapta