March 04, 2023

QuickFix: Set default browser in Visual studio for debugging

Introduction:
In the realm of Dynamics 365 development, encountering issues when debugging and finding that Visual Studio opens objects in Internet Explorer (IE) can be quite frustrating. Although Microsoft no longer officially supports IE, this peculiar behavior persists. Fortunately, there is a simple solution: changing the default browser within Visual Studio. In this blog post, we will guide you through the steps to configure your preferred browser, such as Chrome, for seamless debugging in Dynamics 365.

Step 1: Navigating to Visual Studio Extension
To begin, open Visual Studio and access the "Extensions" menu.

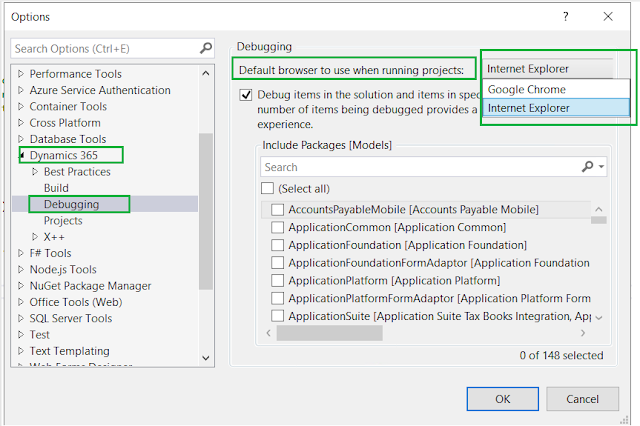
Step 2: Dynamics 365 Extension Options
Within the "Extensions" menu, locate and select the "Dynamics 365" extension. This will open the options panel specific to Dynamics 365 development.

Step 3: Debugging Configuration
Within the Dynamics 365 extension options, find and select the "Debugging" section.

Step 4: Modifying Default Browser
In the Debugging section, you will find the option to modify the default browser used for object debugging.

Step 5: Set Preferred Browser
Choose your preferred browser, such as Chrome or any other compatible browser, as the default option for object debugging.


Conclusion:
By following these simple steps, you can easily resolve the issue of Visual Studio opening objects in Internet Explorer during debugging sessions in Dynamics 365. Take control of your debugging experience and choose a browser that aligns with your preferences and development requirements.

Happy debugging and seamless development!

#VisualStudio #Dynamics365 #Debugging #Development #BrowserConfiguration

-Harry Follow us on Facebook to keep in rhythm with us. https:fb.com/theaxapta

February 25, 2023

Best way to do Postman setup with D365FO

Hi Folks, 

There are very simple steps to do initial setup between Postman and D365FO environment. Please follow below steps.

(Make sure you have added a record in 'Azure Active Directory applications' in D365FO under Sys admin > setup > Azure Active Directory applications )

1. Download postman from here and install on you machine.

2. Do app registration on Azure portal, and make sure you copy all details from app registration to a safe place as not all information will available for later use.

3. Go to environment in left pane and create a new environment, you can name it as same as your D365FO environment like DEV01, UAT, Test etc. This also help when you are working with multiple environment and you keep using same get/post script to access different environments. 

4. Add all the variables here as below

Client_ID: You will get it from Azure app registration. 
grant_Type: client_credentials
resource: D365FO environment URL i<https://D365FOUrl/>
client_secret: You will get it from Azure app registration. 
tenant_id: You will get it from Azure app registration. 
access_token: To generate access token follow step 9.


5. Now create new collection and name it with your environment name eg. Dev01


6. Next, click on 3 dots next to collection name and select 'add request'


7. Name this request as 'Authorization', you can name it as per your use like getting public entities details or get a specific entity data or metadata. In the post request paste below as is.

https://login.microsoftonline.com/{{tenant_id}}/oauth2/token


8. Select 'From-data' in body and set below details.


Now you see we parameterize most of things and you don't need to create multiple request for different environments, you can simple change the environment from right top corner. 

9. Now,  Click on send button and you should get a status 200 message with access token. 
You can add the access token to your environment variable. 

Here we have completed the Postman setup. Now you can try few things to explore this further

10. Add one more request in your collection, and add details as below to get list of public entities. 


-Harry Follow us on Facebook to keep in rhythm with us. https:fb.com/theaxapta